Running a simulation with ResusSim
Everything from installing the app to the debrief: setting up the host computer and the Wi-Fi, signing in, pairing tablets, building a case, running it, what learners see on each device, and reviewing what happened.
Quick start
The shortest path from a new install to a running case. Each step links to the full explanation.
- Install ResusSim on one computer, the host. A Mac or a Windows PC, from sim.resussummit.com/download. Nothing gets installed on the tablets. More →
- Put the host and every tablet on the same Wi-Fi. Hospital or guest Wi-Fi often stops devices talking to each other. If tablets won’t connect, use a phone hotspot or a small router of your own. More →
- Open ResusSim. The very first time, it opens on a network check called “Get the room connected”. Close that window, then click ResusSim in the Dock (Mac) or open ResusSim again from the Start menu (Windows). More →
- Sign in with your beta account. More →
- Scan the QR code on the “Connect the room” screen with each tablet’s camera, and tap what each one is: Monitor, Ventilator, Pumps, EMR, POCUS or Phone. More →
- Press Enter control room. On Scenarios, pick a built-in preset or describe a patient and let the AI build the case. More →
- Connect the monitoring. On Vitals, tick ALL. The monitor shows nothing until you do. More →
- Press ▶ to start. Learners power on their own devices: Admit patient on the monitor, Power on on the pumps and ventilator, Sign in on the EMR. More →
- When it’s over, press ■, at the bottom left of the console. The debrief opens straight away. More →
What you need
One computer runs the simulation. Everything else just opens a web page on it.
| What | Details |
|---|---|
| The host computer | A Mac (macOS 11 or newer, Apple silicon or Intel) or a Windows 10/11 PC. It runs the simulation and the instructor console. Keep it plugged in with the lid open; a closed lid sends it to sleep and stops the sim. |
| Bedside devices | Any tablets, phones or laptops with a current browser (Safari or Chrome from the last few years). iPads from about 2020 onwards draw the monitor and ventilator waveforms smoothly; older ones look rough. Nothing needs installing on them. |
| A shared network | Wi-Fi that the host and every device can join, and that lets them talk to each other. See Choose the network. |
| Internet | Only to download the app, to sign in, and for the AI features. A running simulation never needs it. |
| A beta account | Created at sim.resussummit.com/download. The same account unlocks the downloads and signs you in inside the app. |
How many devices? As many as you like. A good starting set is three tablets: monitor (with the defibrillator built in), EMR, and one more for the ventilator or pumps. One device can also show two or four devices at once (see Split screens).
Choose the network
This is the step that most often goes wrong, so choose before the day. The host and all devices must be on the same network, and that network must let them reach each other.
Option A: the Wi-Fi you already have
Fine in a sim centre or at home. In hospitals and on guest networks it often fails: many are set up so devices can reach the internet but not each other (“client isolation”). The tablet scans the code and then never connects. You can test this in a minute with the setup check.
Option B: a phone or iPad hotspot (best for in-situ drills)
- Turn on Personal Hotspot (iPhone/iPad) or Mobile hotspot (Android) on a phone you’re not using in the sim.
- Join that hotspot from the host computer and from every tablet.
- That’s all. The simulation traffic stays between the devices. Mobile data is only used for things that need the internet, such as the AI features.
Keep the hotspot phone plugged in for long sessions. Some phones limit how many devices can join a hotspot (often about five), so for a bigger set-up use a router.
Option C: a small router of your own (best for a sim centre)
A cheap travel router that’s used only for ResusSim. Plug it in, join the host and tablets to it, and it works the same way every time. It doesn’t need an internet connection.
Not recommended: making a network from the computer itself
A Mac can still create a computer-to-computer network, but it’s hidden in current macOS, has no password, and many phones and tablets can’t join it. Windows’ Mobile hotspot usually won’t start unless the PC is already connected to another network. Options B and C are more reliable.
Set up the host computer
Install
Download from sim.resussummit.com/download. Creating your account there unlocks the installers straight away, and the download page walks through each step with pictures.
- Mac: open the .dmg and drag ResusSim into Applications. The app is signed and notarised by Apple, so it opens normally.
- Windows: run the installer. The Windows build isn’t code-signed yet, so Windows shows “Windows protected your PC”. Click More info, then Run anyway.
Allow network connections
Tablets connect into the host, so the computer’s firewall has to allow it.
- Mac: if macOS asks whether ResusSim may accept incoming network connections, click Allow.
- Windows: if Windows Defender Firewall asks about ResusSim, allow it on Private networks. On a managed hospital PC this may need IT. Also check the Wi-Fi you’re on is set to Private, not Public, in Windows’ network settings.
The first launch: the setup check
The first time it opens, ResusSim shows Get the room connected, a three-step check that the network will work. It’s worth doing once (see below). This screen has no button through to the console. When you’ve finished with it:
- Mac: close the window, then click ResusSim in the Dock.
- Windows: close the window, then open ResusSim again from the Start menu, or click its icon in the system tray (bottom right, near the clock) and choose Open console.
From then on, ResusSim opens straight onto the console.
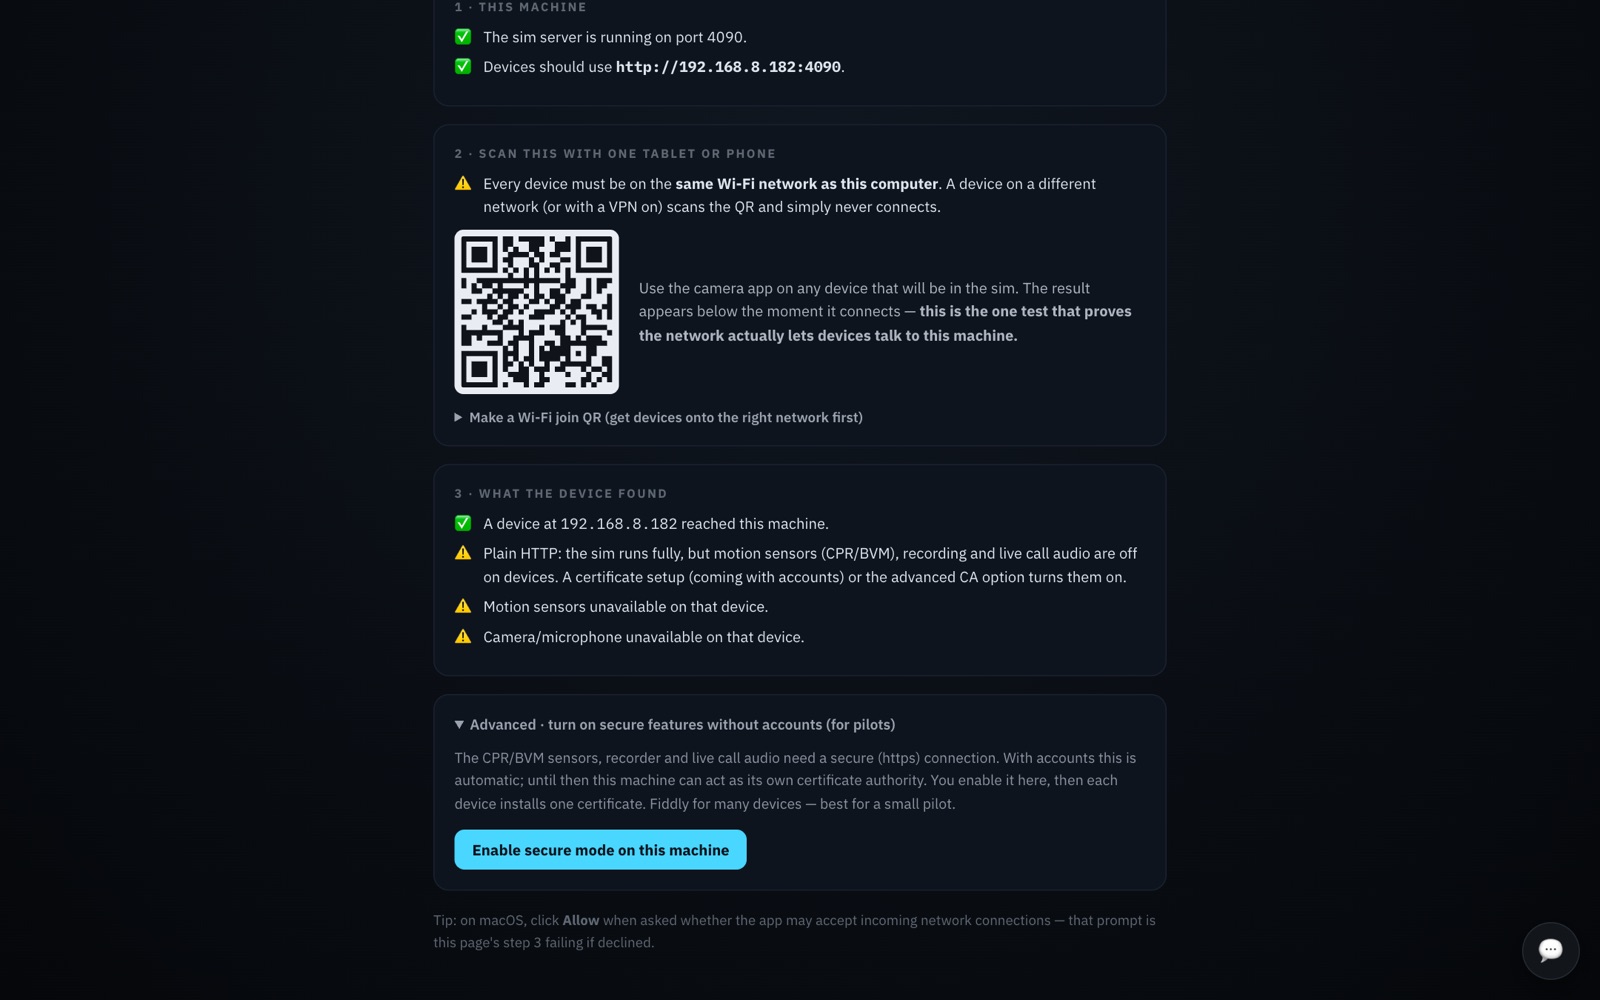
The setup check
Run this once on any new network. It proves the tablets can actually reach the host, before a room full of people is waiting.
- 1 · This machine shows the address devices will use, such as http://192.168.1.20:4000. If it says the computer isn’t connected to any network, join the Wi-Fi or hotspot first. If another program was already using port 4000, an amber line says so and ResusSim uses the next port (see Troubleshooting).
- 2 · Scan this: point one tablet’s or phone’s camera at the QR code and open the link.
- 3 · What the device found: within a few seconds, “A device at … reached this machine” appears with a green tick. That means the network works.
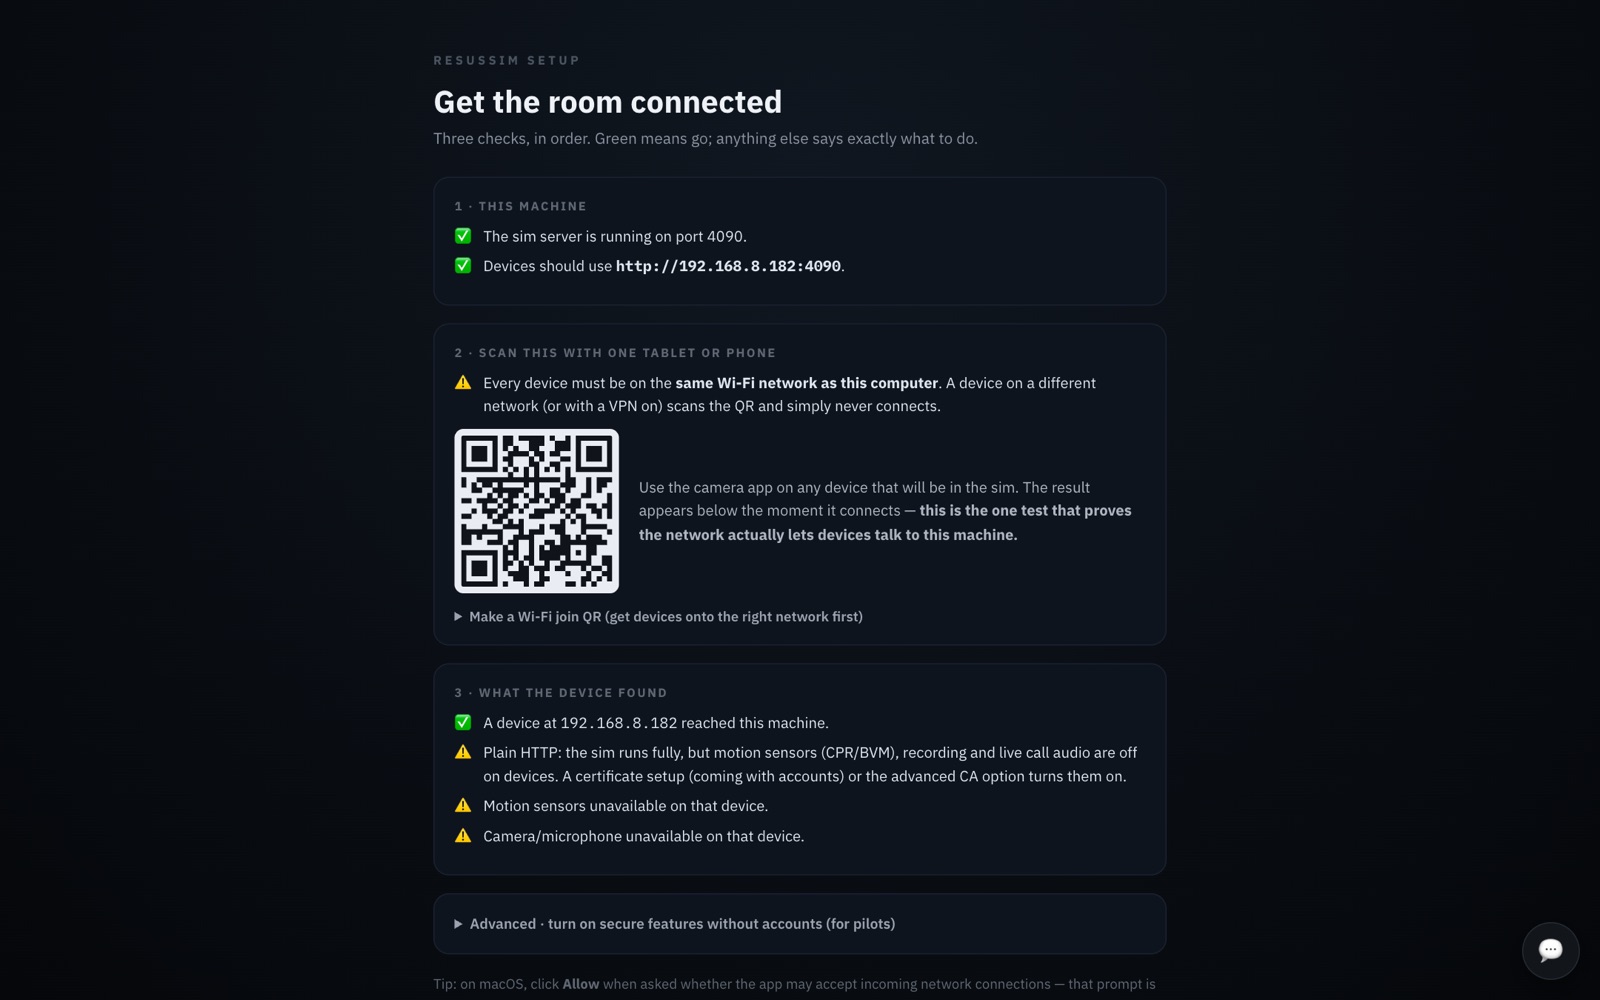
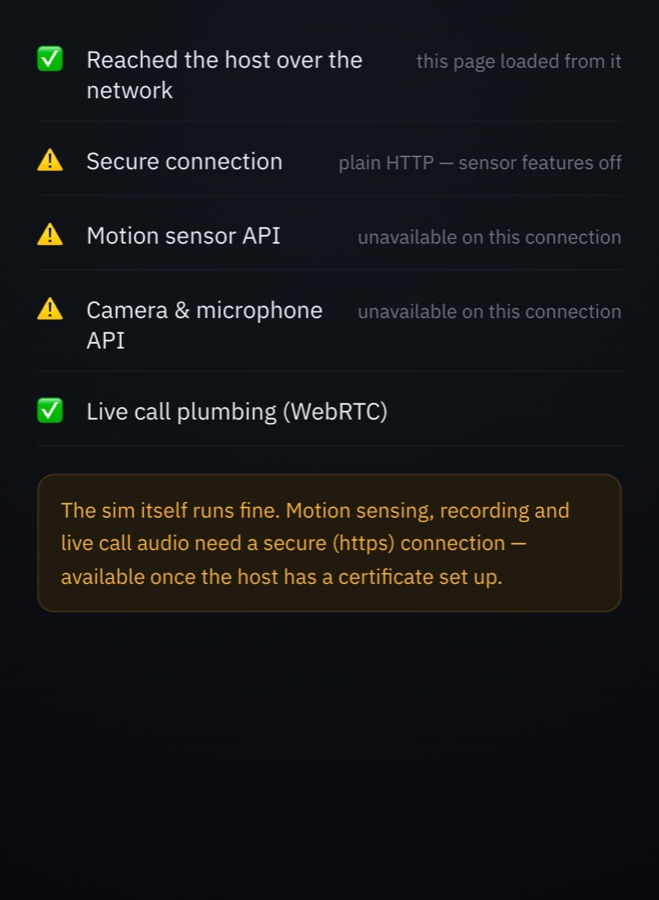
The amber lines about plain HTTP, motion sensors and camera are normal. They only matter for the optional extras in Secure mode. If nothing appears after a scan, see Troubleshooting.
The page also has Make a Wi-Fi join QR: type the network name and password, and devices can scan it to join the right Wi-Fi first.
You can come back to this check at any time: ⚙ Network setup & device check on the console’s Devices tab, or Open setup check from the ResusSim menu-bar or tray icon.
Keep it running
- Closing the window doesn’t quit ResusSim. It keeps hosting in the background, shown by its icon in the menu bar (Mac) or tray (Windows). To get the window back, click ResusSim in the Dock (Mac) or open it again from the Start menu (Windows). Quit from the menu-bar or tray icon, or press ⌘Q on a Mac.
- Updates download automatically and install when you quit, never mid-session. This works from version 0.1.0-beta.2 on: if you have an earlier version, install the new one once by hand from sim.resussummit.com/download. Your rooms and settings are kept.
Sign in
Sign in with the email and password of your beta account. You only need the internet for this first sign-in.
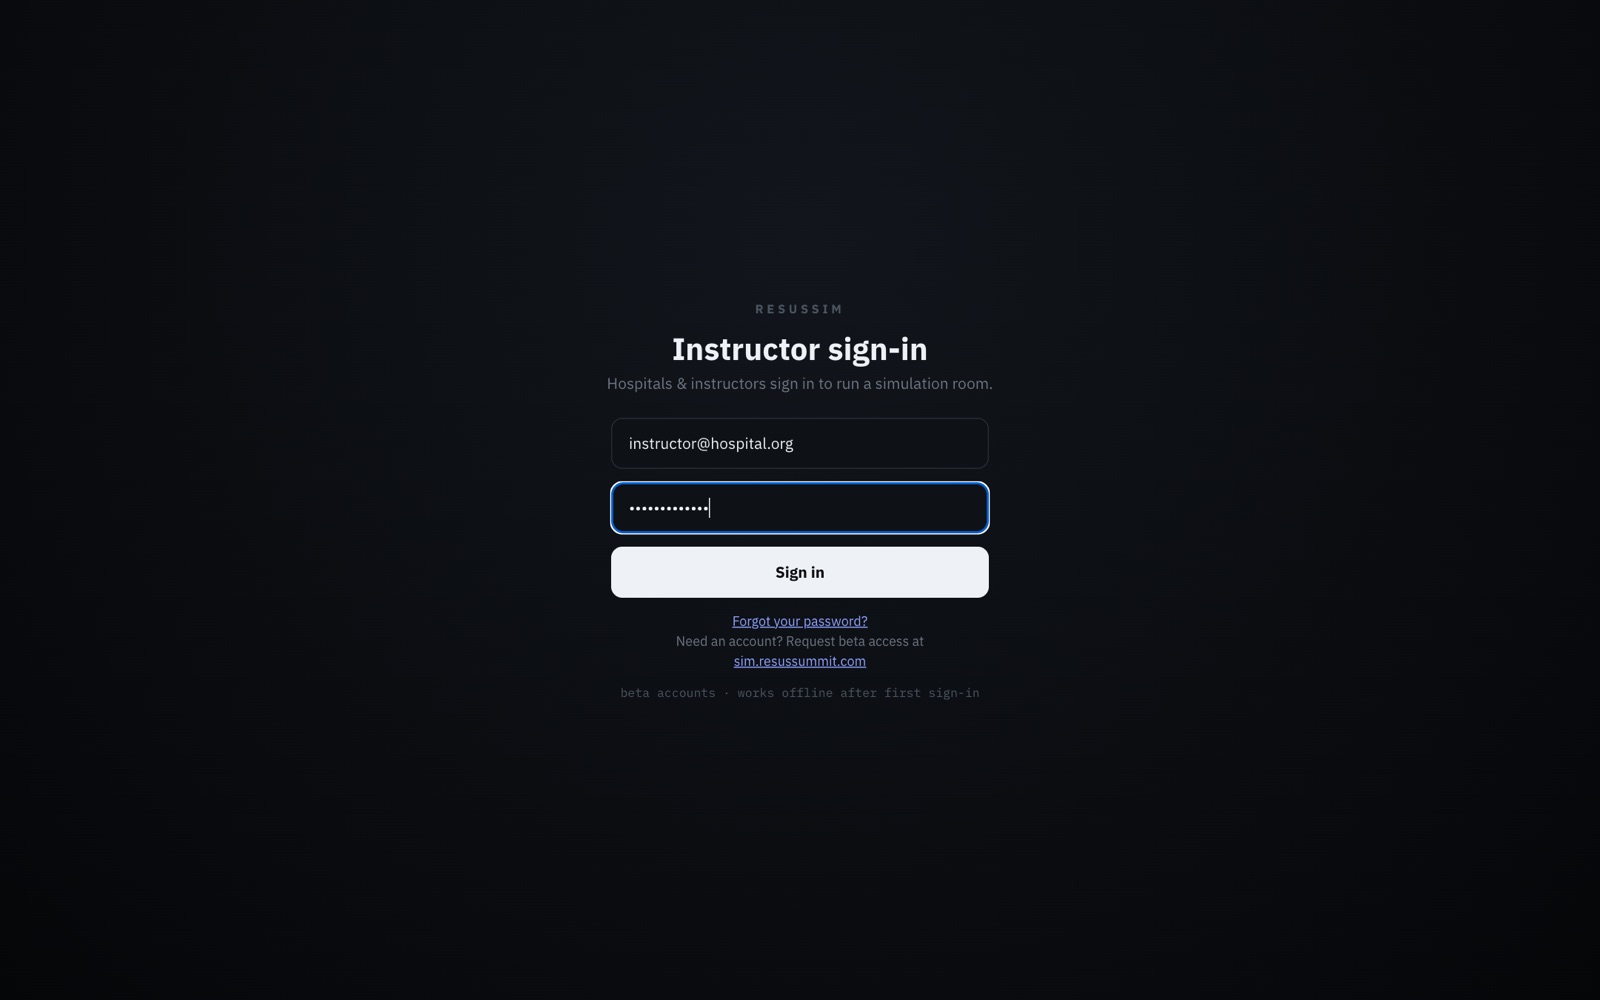
- You stay signed in, including after restarts. There’s no sign-out button.
- Offline: if you’re asked to sign in with no internet, it still works as long as this computer has been online at some point in the last 7 days.
- “Your account is awaiting approval” appears only when the team is approving new accounts by hand. You’ll get an email when yours is approved.
- Forgot your password? The link under the button opens the reset page.
Connect the tablets
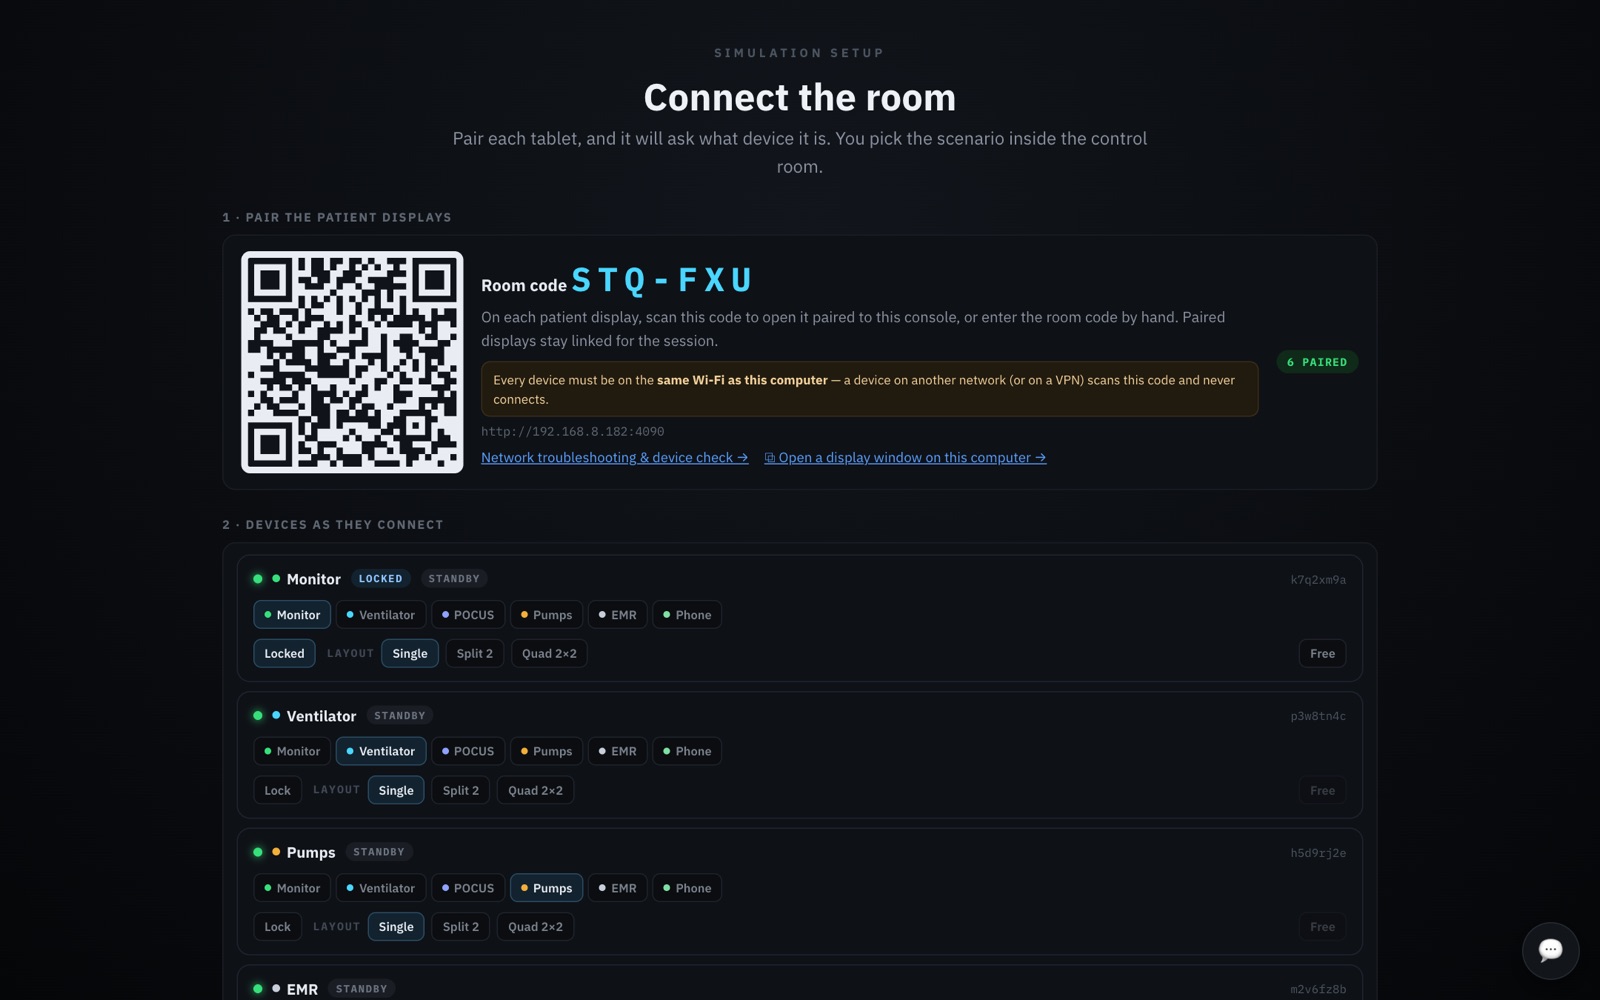
After you sign in, the console opens on Connect the room. Pair every device here, before you go into the control room.
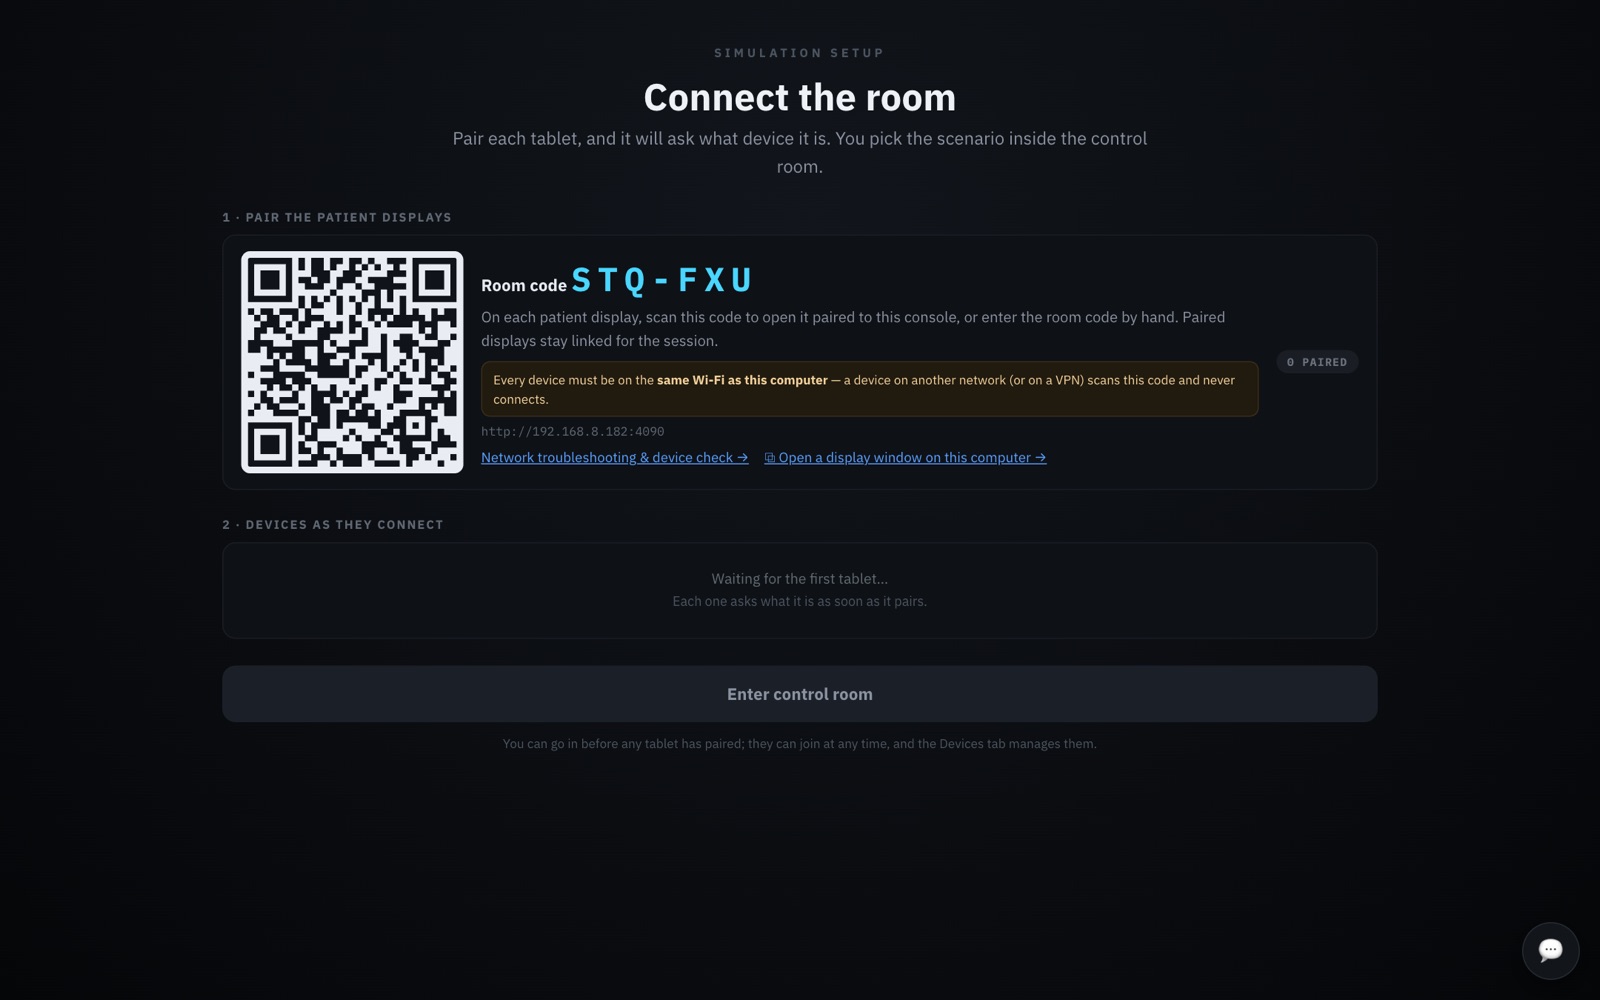
Pair a tablet
- Make sure the tablet is on the same Wi-Fi as the host.
- Open the tablet’s camera and point it at the QR code. Tap the link that appears. The tablet opens already paired to your room.
- The tablet asks What is this device? Tap its role.
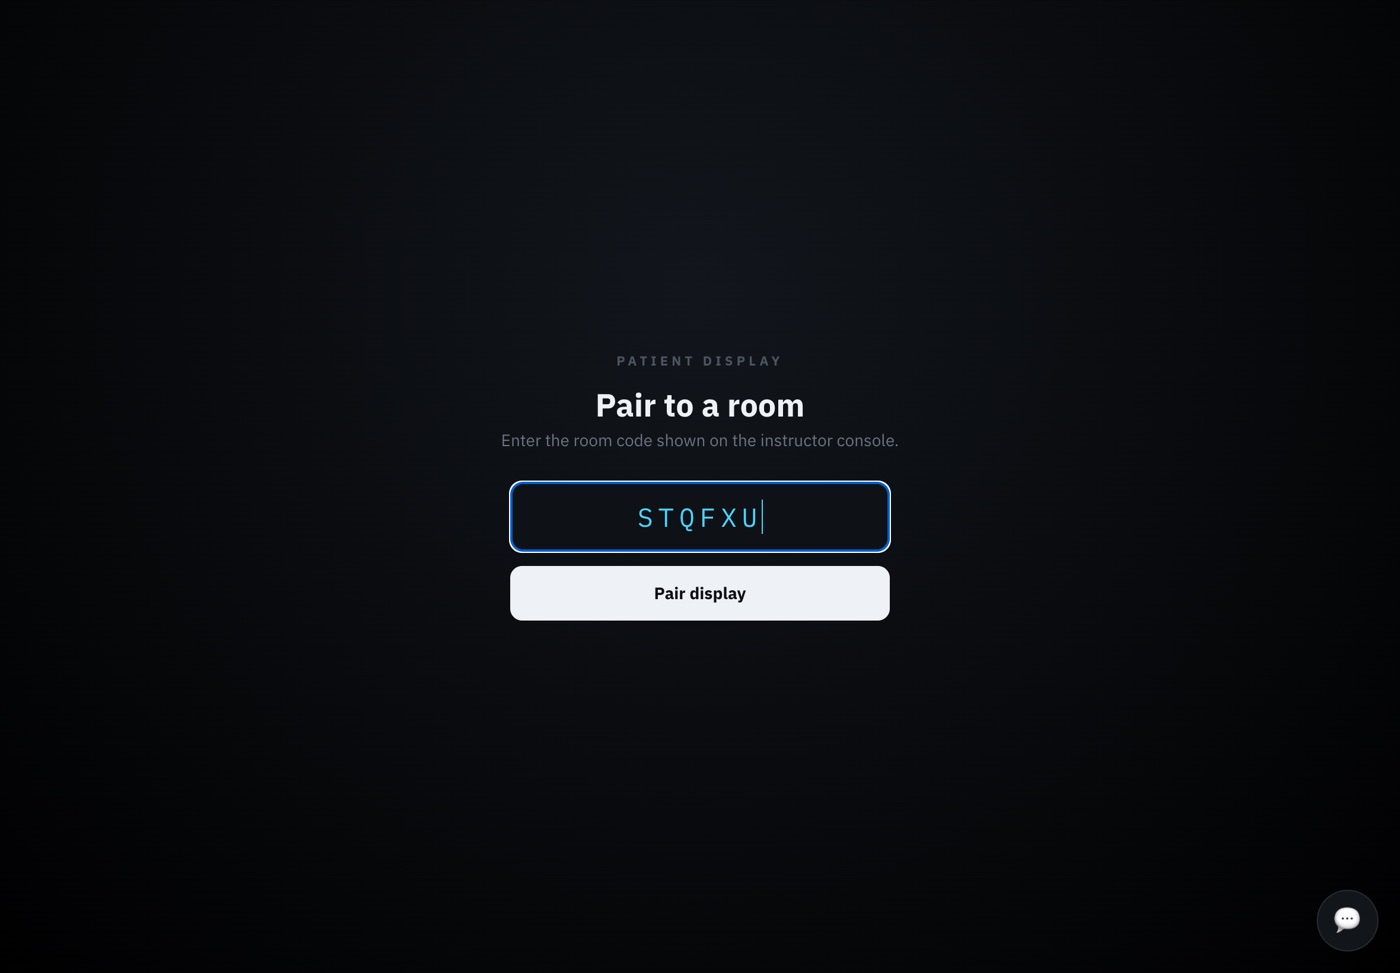
No camera, or the QR won’t scan? Type the address shown under the room code, followed by /display, into the tablet’s browser, for example http://192.168.1.20:4000/display. Then enter the room code and tap Pair display.
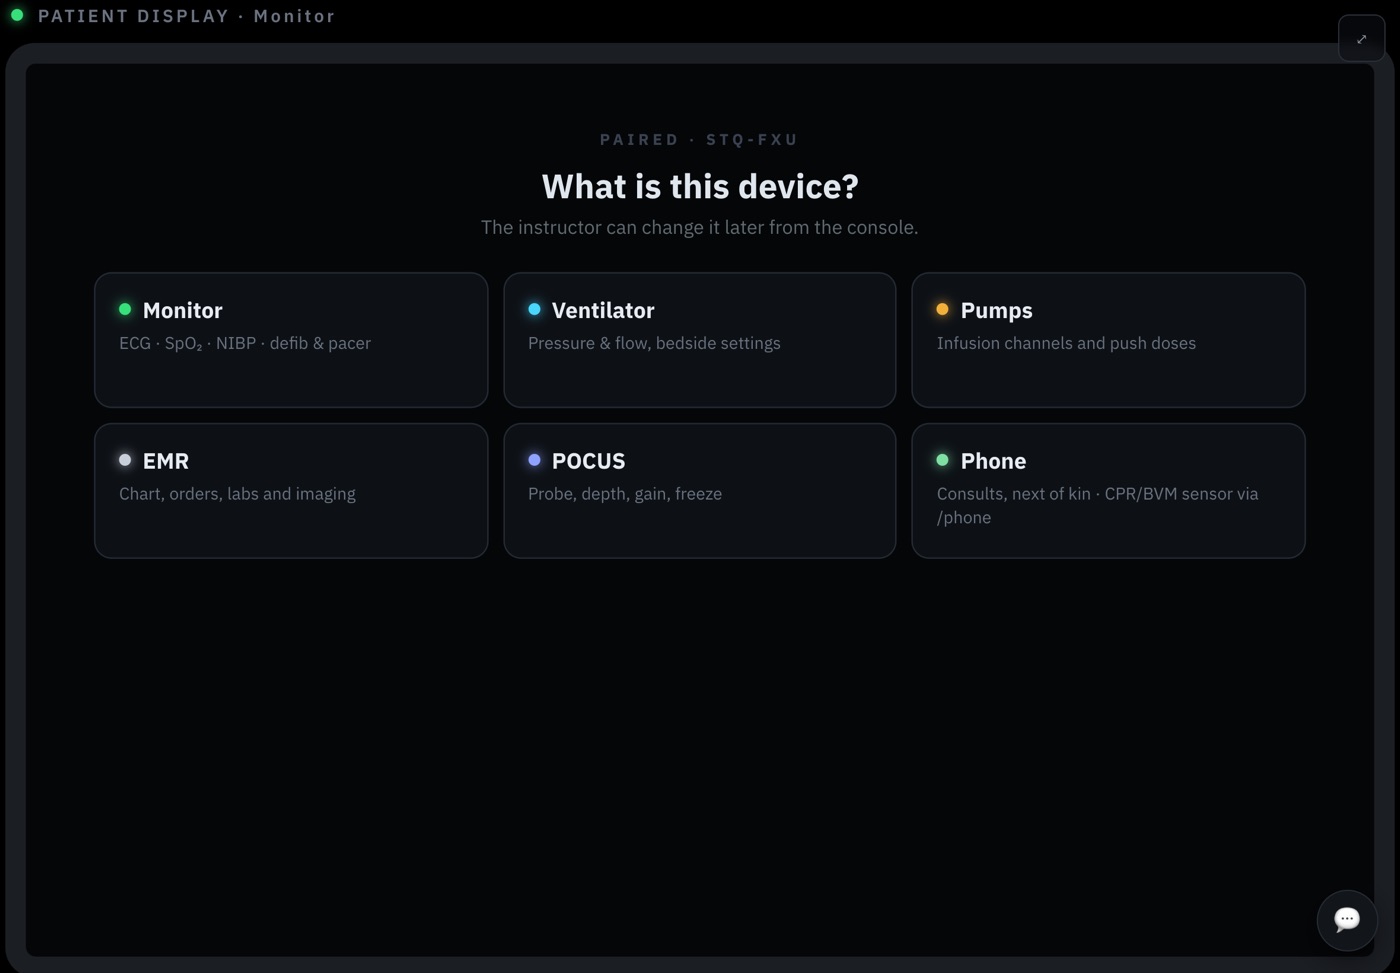
The six roles
| Role | What it becomes |
|---|---|
| Monitor | The patient monitor (ECG, SpO₂, blood pressure, respiratory rate, EtCO₂, temperature), with the defibrillator and pacer built in. |
| Ventilator | A ventilator with pressure and flow waveforms and bedside settings. |
| Pumps | Infusion pumps. Infusions are started from the EMR, then run and titrated here. |
| EMR | The electronic record: chart, ambulance handover, notes, prescribing, nursing orders, labs and imaging, disposition. |
| POCUS | A point-of-care ultrasound screen with depth, gain and freeze. |
| Phone | A ward phone for calling specialists and next of kin. You answer as the specialist. |
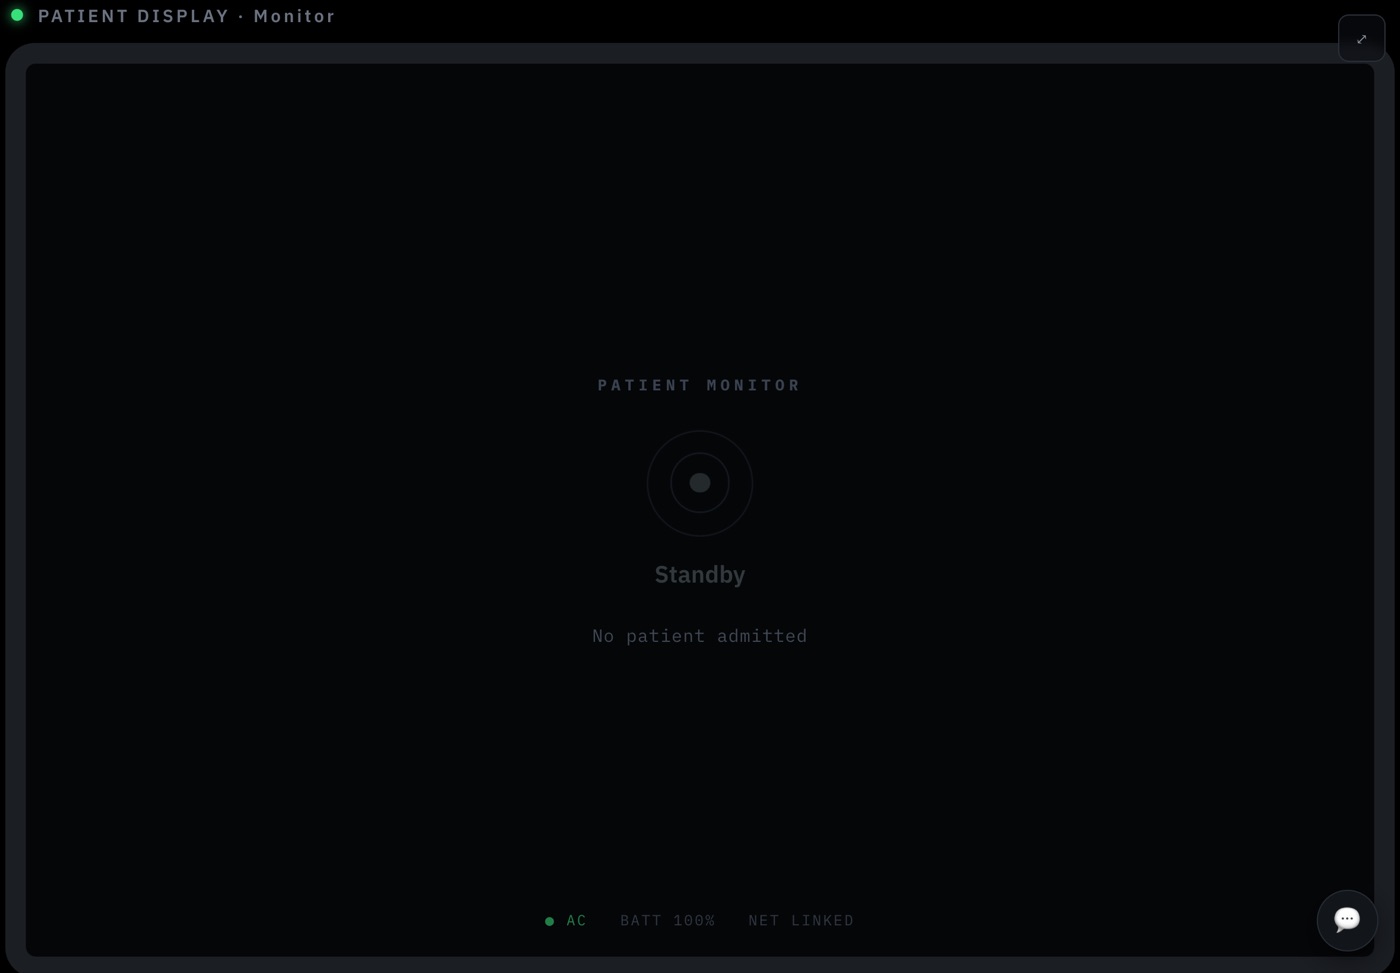
The tablet then waits on a standby screen. It comes to life when the simulation starts and the learner switches it on (see Run the simulation).
Watch them arrive
Each paired device appears under 2 · Devices as they connect, with its role. You can change any role here.
Enter the control room
When everything’s paired, press Enter control room. You can go in before any device has paired.
A display on the host computer
⧉ Open a display window on this computer opens a display in a second window, for a second screen or a projector. Type the room code into it. The window can take any role, just like a tablet.
The control room
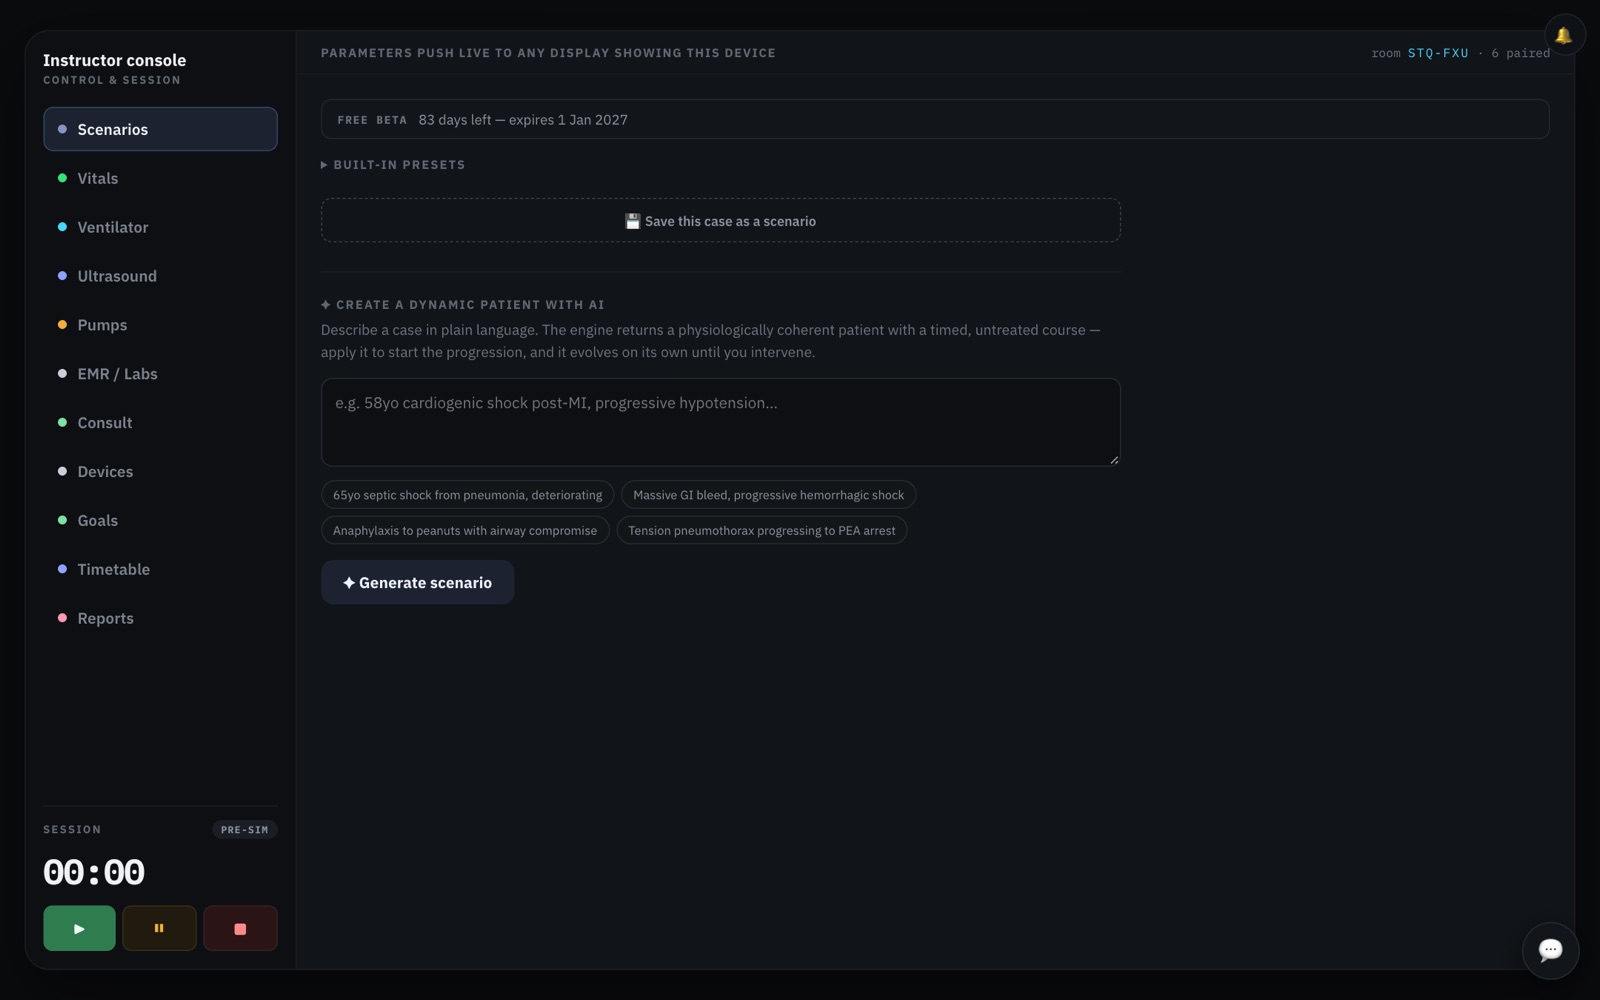
This is your side of the simulation. Everything you change here reaches the learners’ devices immediately.
The tabs
| Tab | What it’s for |
|---|---|
| Scenarios | Load a preset, generate a case with AI, follow the running case, save cases. |
| Vitals | The patient: rhythm, vital signs, blood pressure cuff and arterial line, CPR, ROSC, the 12-lead ECG, and what shocks and pacing do. |
| Ventilator | Ventilator mode and settings, lung mechanics, oxygen supply failure. |
| Ultrasound | Choose where the probe is and what the scan shows. |
| Pumps | See running infusions; trigger pump alarms. |
| EMR / Labs | The chart the learners see, the units, and results for labs and imaging. |
| Consult | Answer the learners’ phone calls and messages as the specialist. |
| Devices | Change, lock, split or free each tablet. |
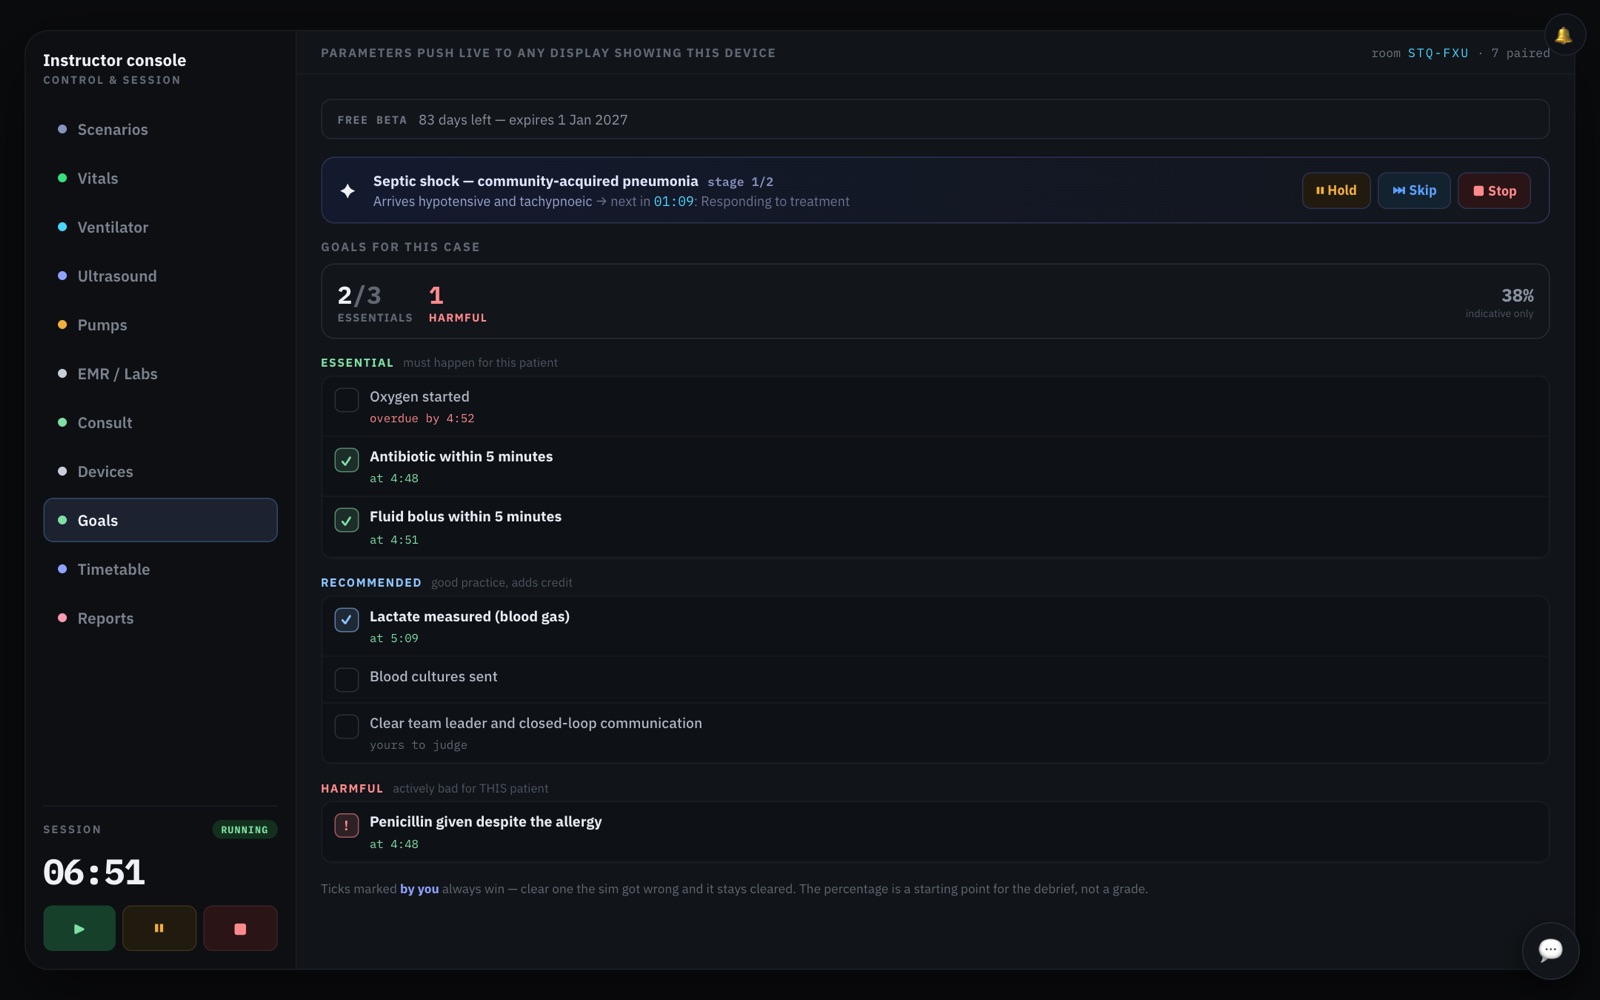
| Goals | What the case tests, ticked off as the team does it. |
| Timetable | A timed log of everything that happened. |
| Reports | Beta feedback sent from the feedback bubble. Not a session report. |
A tab flashes with an amber number when something is waiting: a test the learners have requested (EMR / Labs), a phone call or message (Consult), or a tablet that hasn’t chosen a role (Devices).
The session controls
Bottom left: the status (PRE-SIM, RUNNING, PAUSED, ENDED), the clock, and three buttons:
- ▶ Start / resume
- ⏸ Pause. See Pausing: on its own, it doesn’t pause a timed case.
- ■ Stop ends the case and opens the debrief immediately, with no confirmation and no way back.
The 🔔 at the top right mutes the console’s rings and alerts. The 💬 bubble at the bottom right sends feedback to the ResusSim team (see Getting help).
The Devices tab
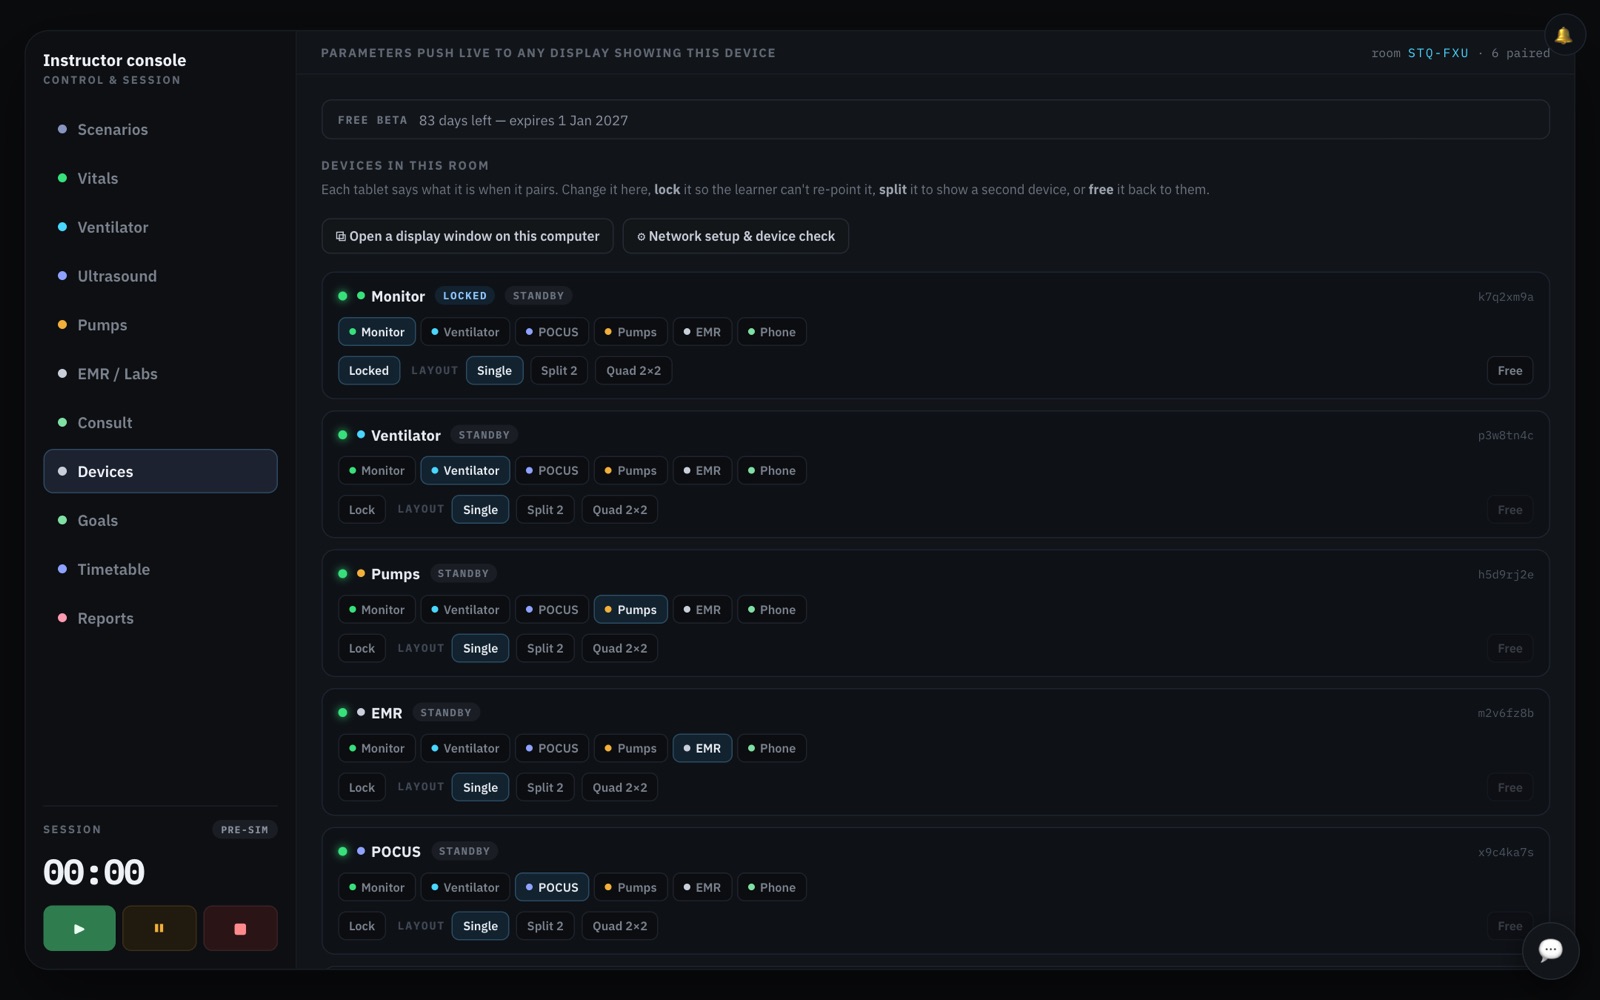
- Role chips change what a tablet shows. Changing a role sends that tablet back to standby; the learner switches it on again.
- Lock stops learners changing the tablet themselves.
- Layout: Split 2 or Quad 2×2 shows two or four devices on one screen, which is handy for a big TV or for when you’re short of tablets.
- Free unlocks and un-splits it, keeping the role.
- Forget removes a tablet that’s gone offline.
- All screens at once makes every display show the same device, for example to put the monitor on every screen.
Set up a case
Choose a patient on the Scenarios tab, check the chart, decide what you’re assessing, then connect the monitoring.
Option 1: a built-in preset
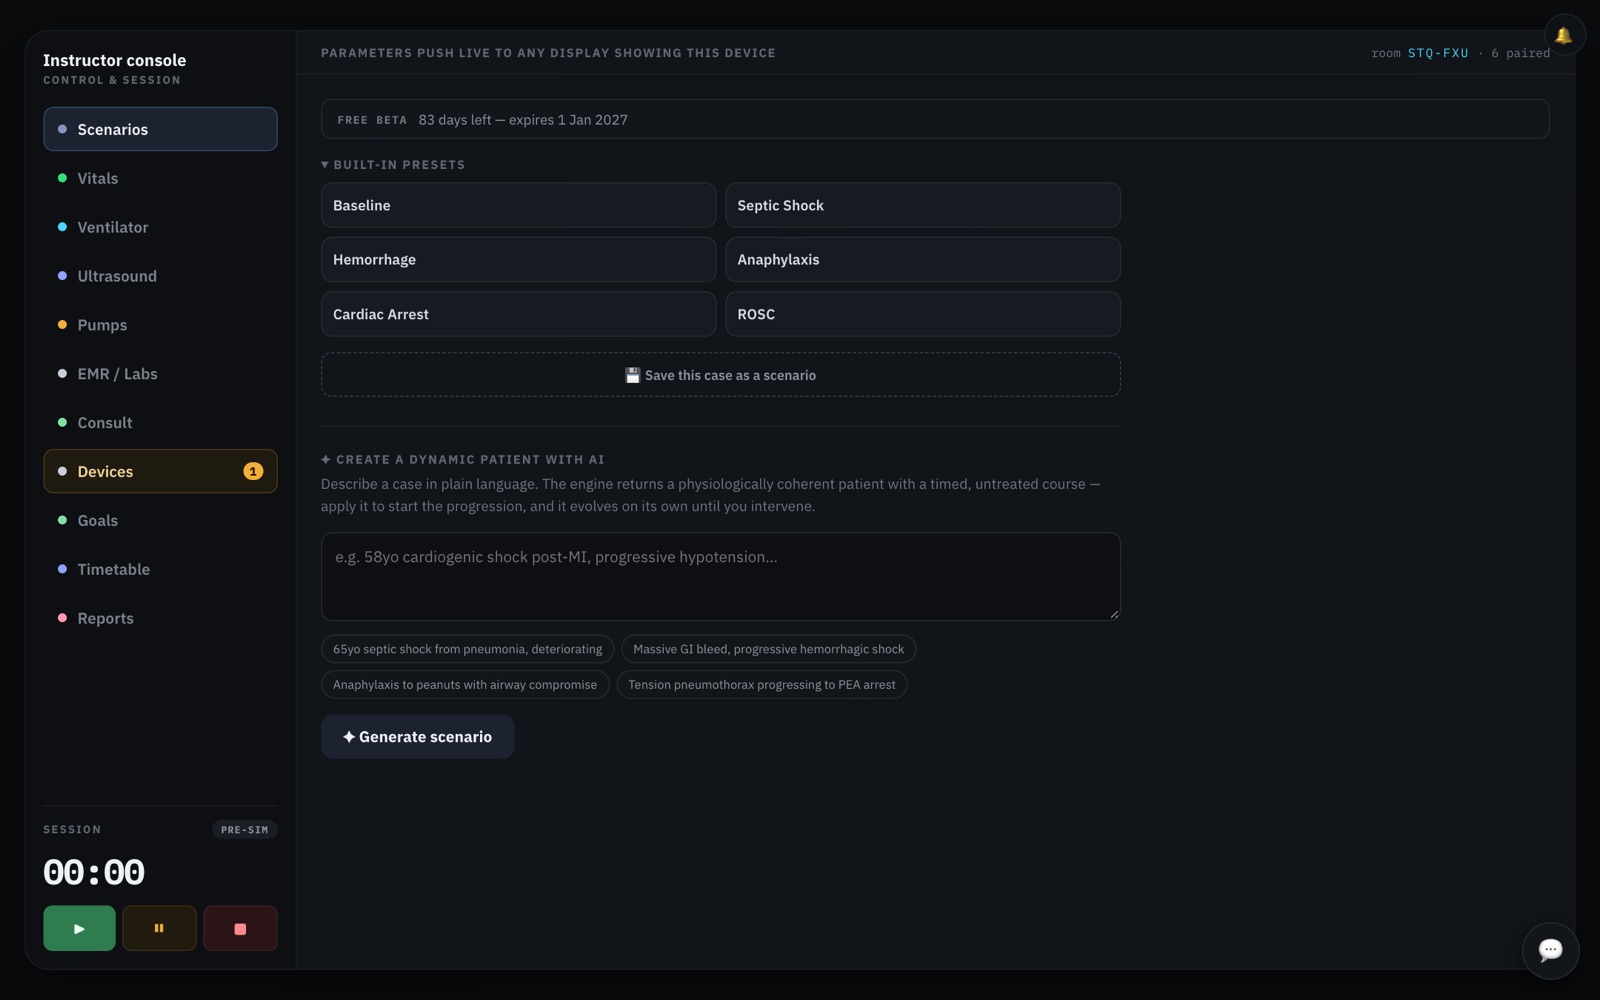
Open BUILT-IN PRESETS and click one: Baseline, Septic Shock, Hemorrhage, Anaphylaxis, Cardiac Arrest or ROSC. Presets set the starting vital signs and rhythm only. They don’t change on their own; you drive the patient from the Vitals tab.
Option 2: describe a patient and let the AI build it
Type a one-line description under ✦ CREATE A DYNAMIC PATIENT WITH AI. You get a complete case: vital signs, a timed course if untreated, what happens if the team acts in time, the ambulance handover and background, results, and goals. See AI features.
Option 3: one of your saved scenarios
Cases you’ve saved appear under MY SCENARIOS. Click one to load it. A ▸ after the name means it has a timed course.
The patient’s chart
The EMR / Labs tab holds what the learners will read on the EMR: the EMS handover (complaint, pre-hospital observations, story, treatment en route) and the background (past history, regular medicines, allergies). AI-built cases fill these in. Edit any field; changes save when you click out of the box.
Set the units for the whole room here too: US conventional, UK or SI. The UNITS · WHOLE ROOM row only appears once a lab is selected, and the tab opens on the 12-lead, so click VBG / ABG (or any lab) in the list first. This changes lab units, temperature (°C or °F) and EtCO₂ (kPa or mmHg). ResusSim starts in US units; choose UK or SI here. Starting a new case puts them back to US, so set them again for each case. The screenshots in this guide use UK units.
Goals
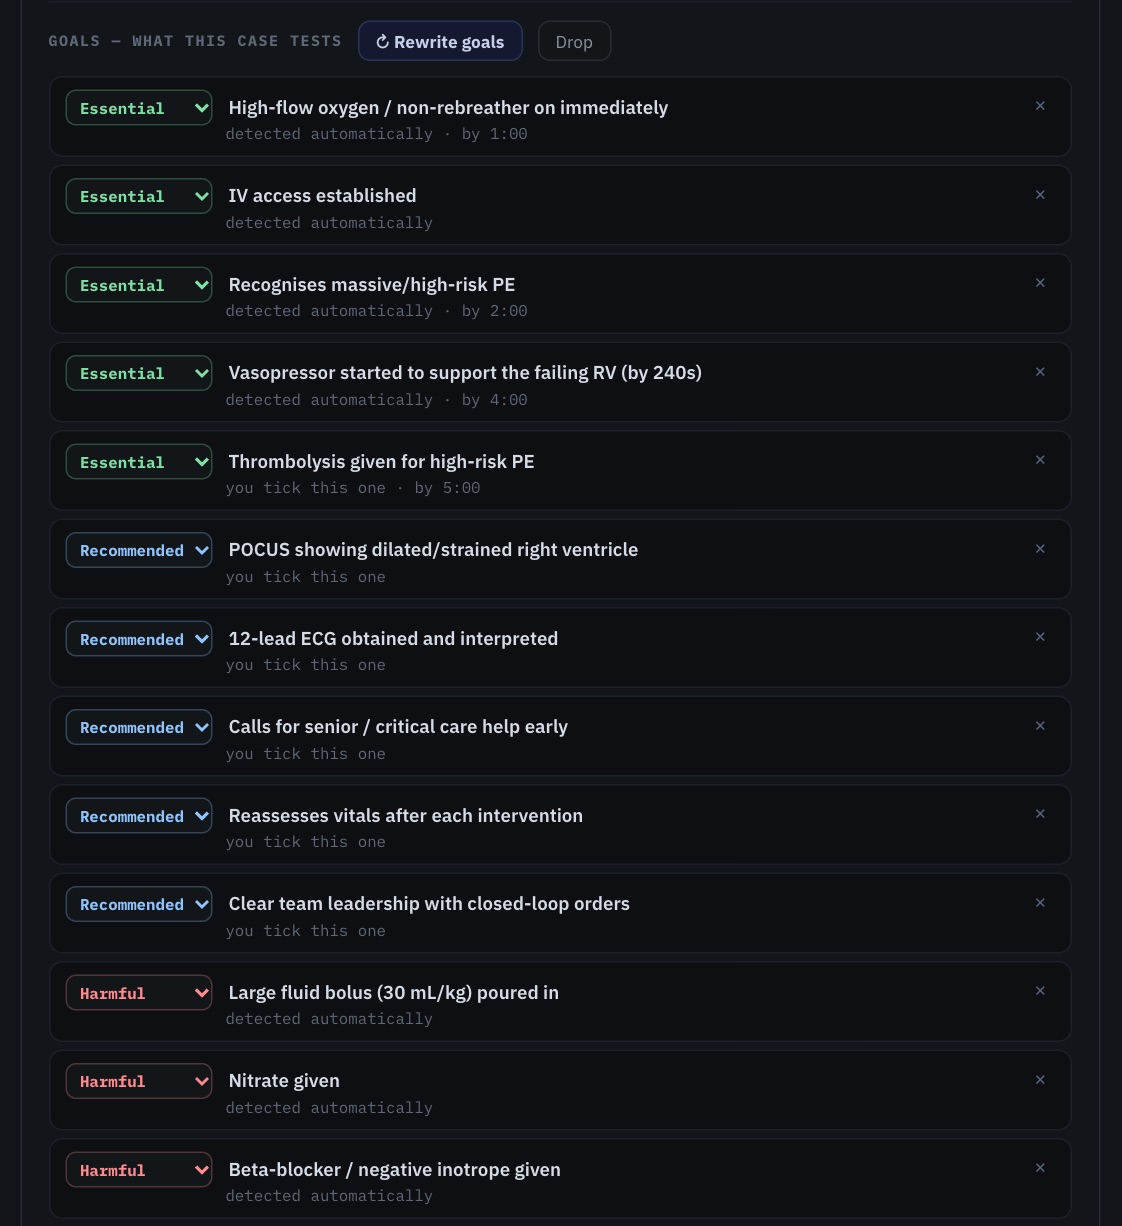
Goals are what the case tests: things the team must do (essential), should do (recommended), and must not do (harmful), optionally with a deadline. ResusSim ticks most of them automatically as the team acts. Goals are written in the AI case preview (Write the goals), before you apply the case.
Save the case
💾 Save this case as a scenario keeps the current patient, chart, ECG, lungs, results and timed course under MY SCENARIOS.
Connect the monitoring
The monitor starts with nothing attached: it shows LEADS OFF and no numbers. On the Vitals tab, tick ALL, or tick each box as the team puts on the ECG leads, the saturation probe and the capnography. Learners can take a blood pressure themselves from the monitor.
AI features
Four things in ResusSim use AI. They need the host to be online and signed in. Everything else works offline.
Build a case from a description
- On Scenarios, type a description in the box, such as “65yo septic shock from pneumonia, deteriorating”, or tap one of the examples.
- Press ✦ Generate scenario. It takes a few seconds.
- Read the preview: opening rhythm and vital signs, the untreated course stage by stage, and the ambulance handover and background.
- Not quite right? Type what to change, such as “make the arrest PEA, move stage 2 to 3 minutes”, and press ↻ Revise with AI.
- Press ✓ Apply & go to sim. The case is loaded and waits for you to press ▶.
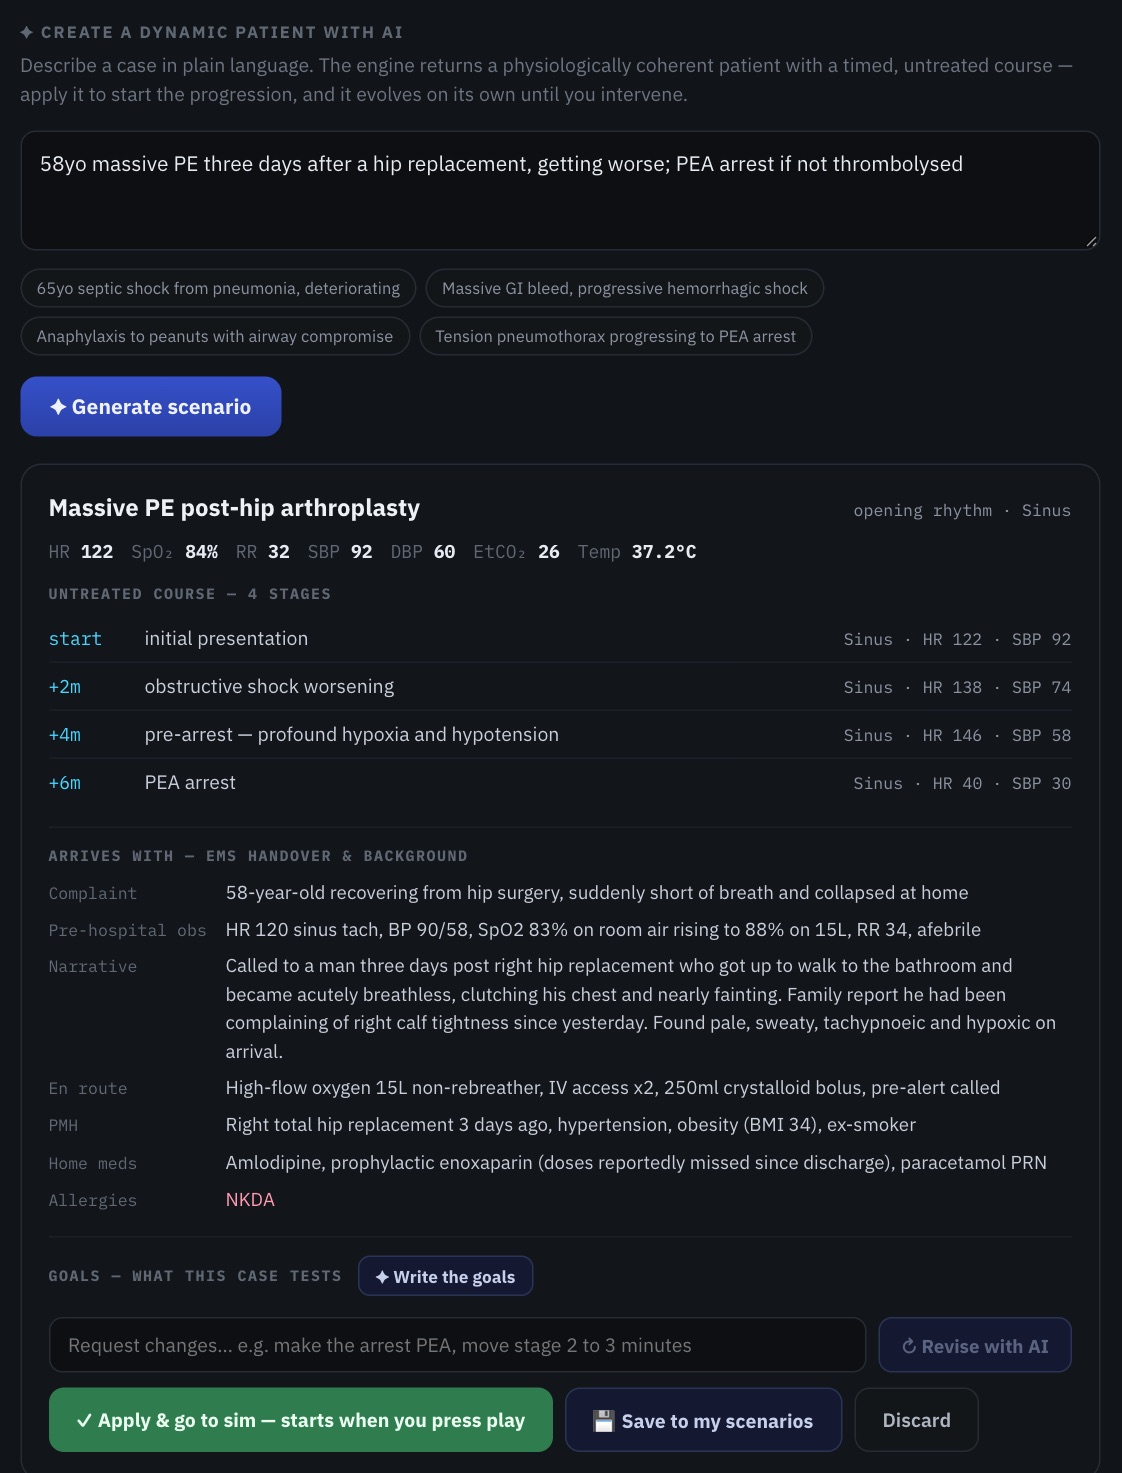
You can fine-tune anything after applying, using the normal tabs. To use the case again, press 💾 Save to my scenarios in the preview.
Write the goals
In the preview, ✦ Write the goals drafts what the case tests. Change any goal’s tier (Essential, Recommended, Neutral, Harmful), edit its wording, or delete it. Goals marked “you tick this one” are things only you can judge, such as leadership. Apply the case, and the goals appear on the Goals tab.
Change what happens next
While a case is running, the box under the case on Scenarios rewrites the rest of it. For example: “they’re coping too well — make them arrest in two minutes unless they get adrenaline”. Press Change the case. The patient stays where they are; only what’s still to come changes.
Describe an ECG
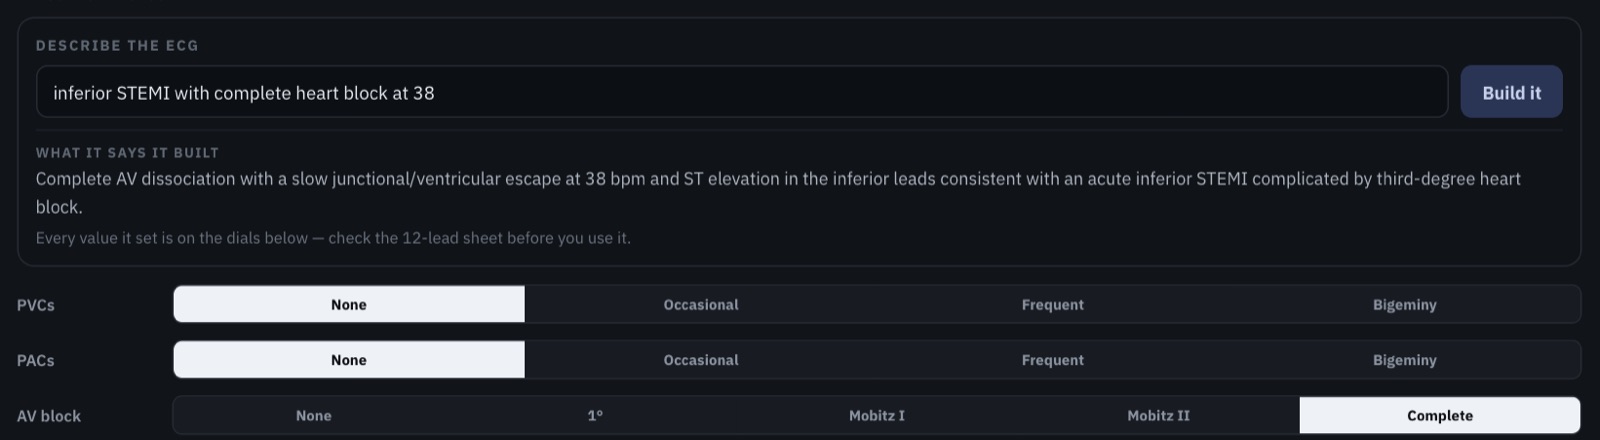
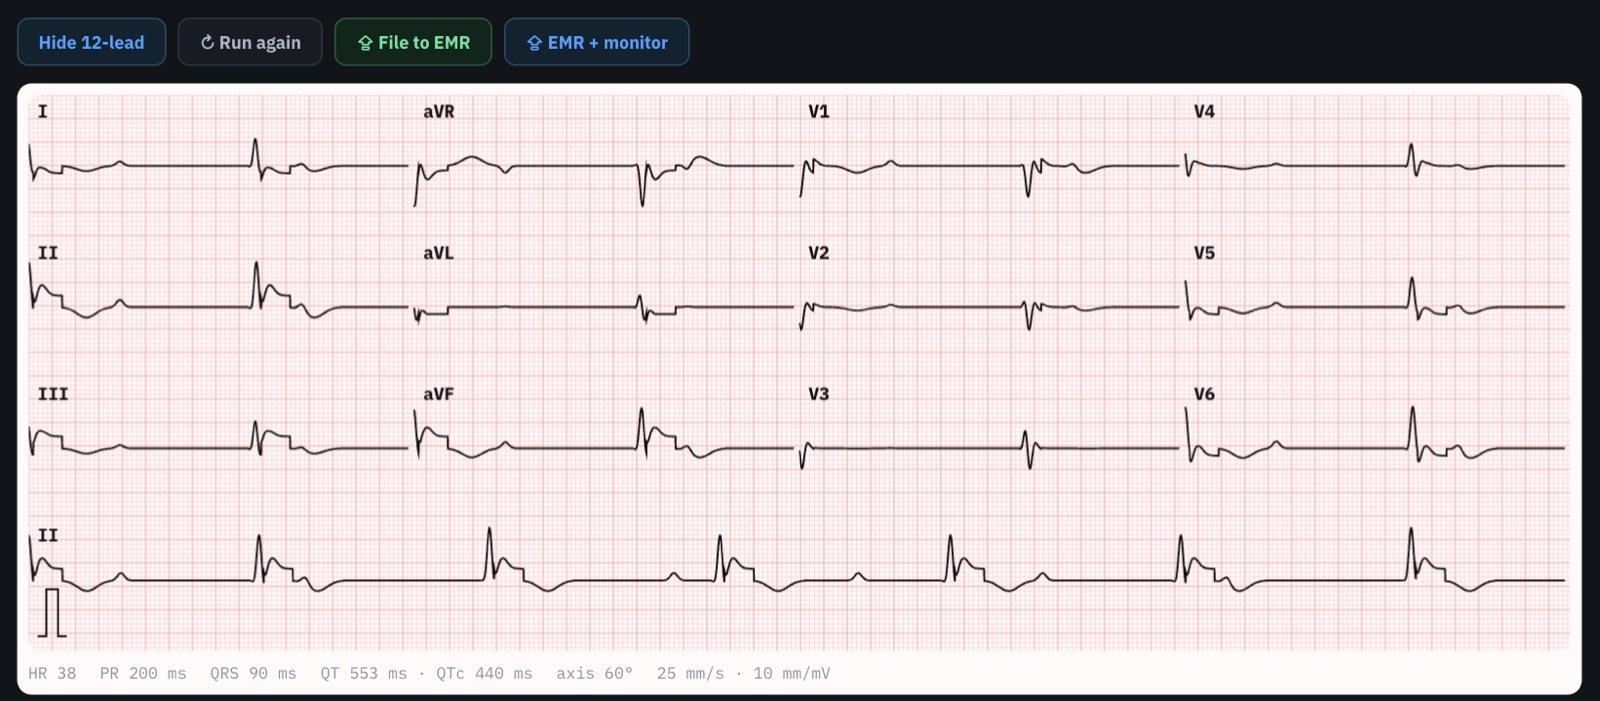
On Vitals, open ECG MORPHOLOGY. Under DESCRIBE THE ECG, type something like “inferior STEMI with complete heart block at 38” and press Build it. ResusSim sets the ECG controls to match and shows what it built, so you can check it. This changes the live rhythm and heart rate, so use it before the case or when you mean to.
Your daily allowance
The AI features run on a commercial AI service that charges for every request. We’re paying for it during the free beta, which is why each account has a daily allowance. We hope to find a sponsor to cover these costs, so ResusSim can stay free for as long as possible and the features already in the pipeline can follow.
Each beta account has 10 AI requests per rolling 24 hours, enough for three or four complete cases. The console shows how many you’ve used. Every press of a button counts: generate, revise, write goals, change the case, build an ECG. A generated case with ECG findings counts as two.
When the AI isn’t available
With no internet, ResusSim falls back to built-in content. For a new case it says so clearly: NOT GENERATED — OFFLINE FALLBACK, with a stock case that doesn’t reflect what you typed. The other three fall back without a warning: Write the goals gives five generic goals, Build it matches keywords only, and Change the case applies a stock course. When you’re offline, check what they produce, or set things by hand.
Generate cases while you’re online and save the ones you like, so you can run them anywhere.
Run the simulation
Start
- Press ▶. The status changes to RUNNING and the clock starts.
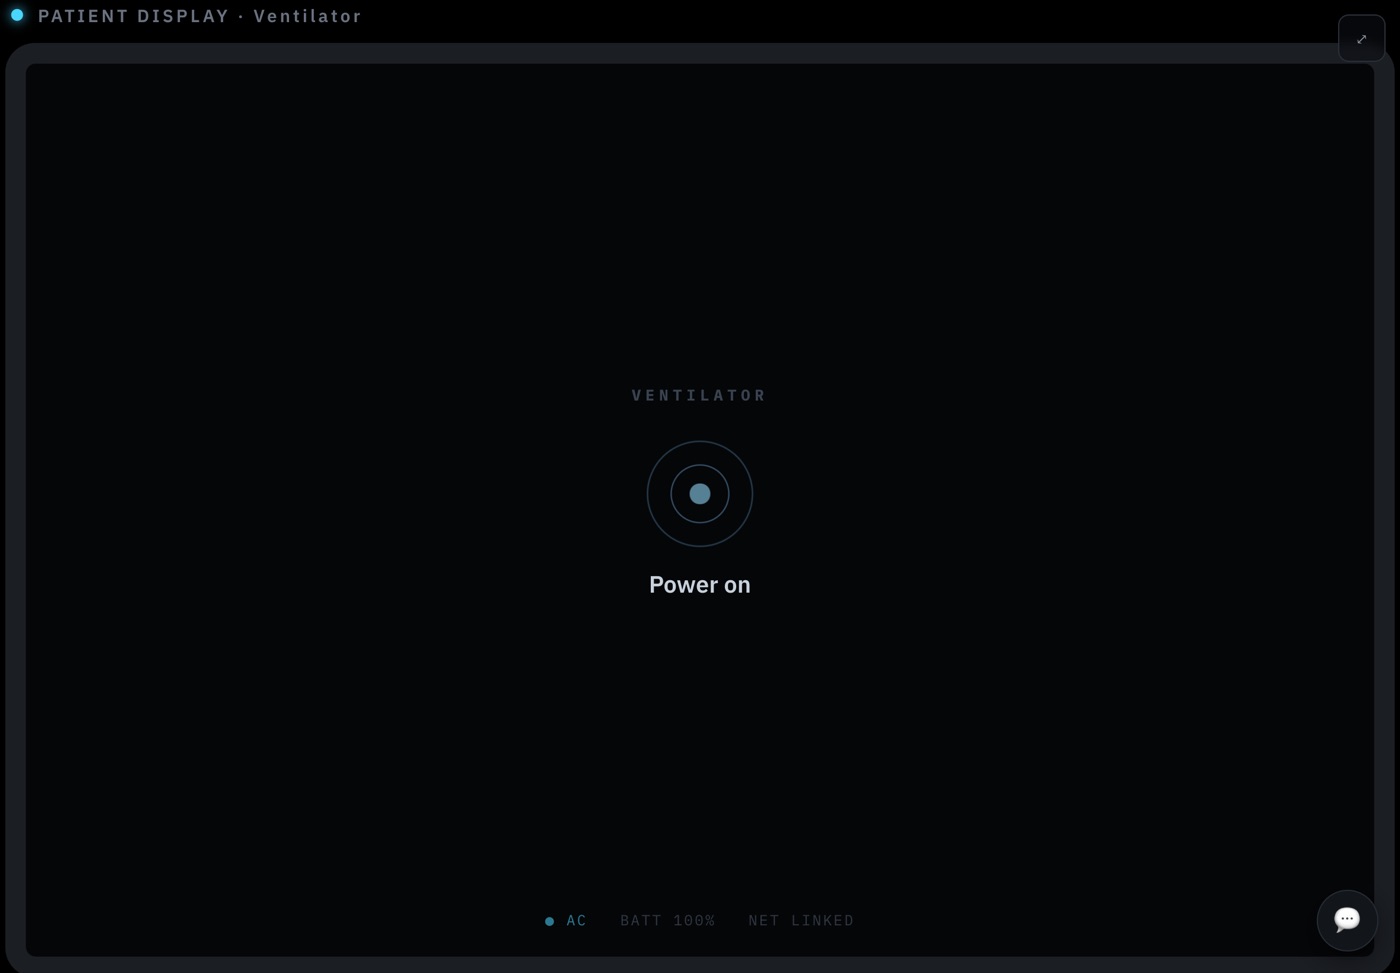
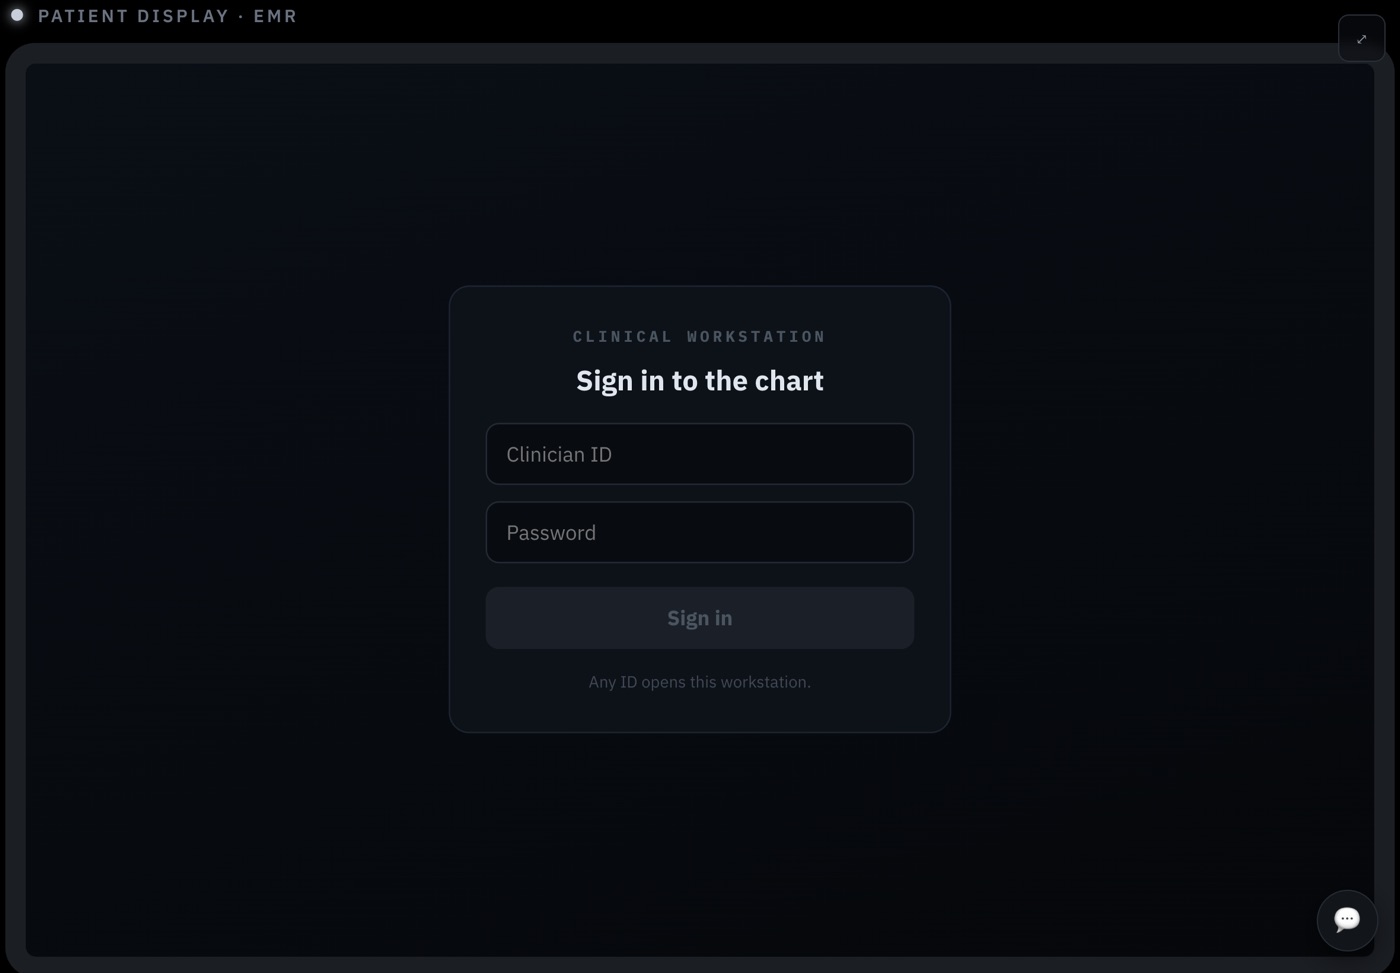
- The learners switch on their own devices, just as they would in real life: Admit patient on the monitor, Power on on the ventilator and pumps, Begin exam on the ultrasound, and Sign in on the EMR (any name, any password).
Follow a timed case
AI-built and saved cases with a course run on their own. The banner across the top and the card on Scenarios show:
- Course of the case: each stage of the untreated course and when it’s due.
- If the team acts, and how long they have: what the team has to do, by when, and what happens if they do. When they do it in time, it shows DONE — case forked.
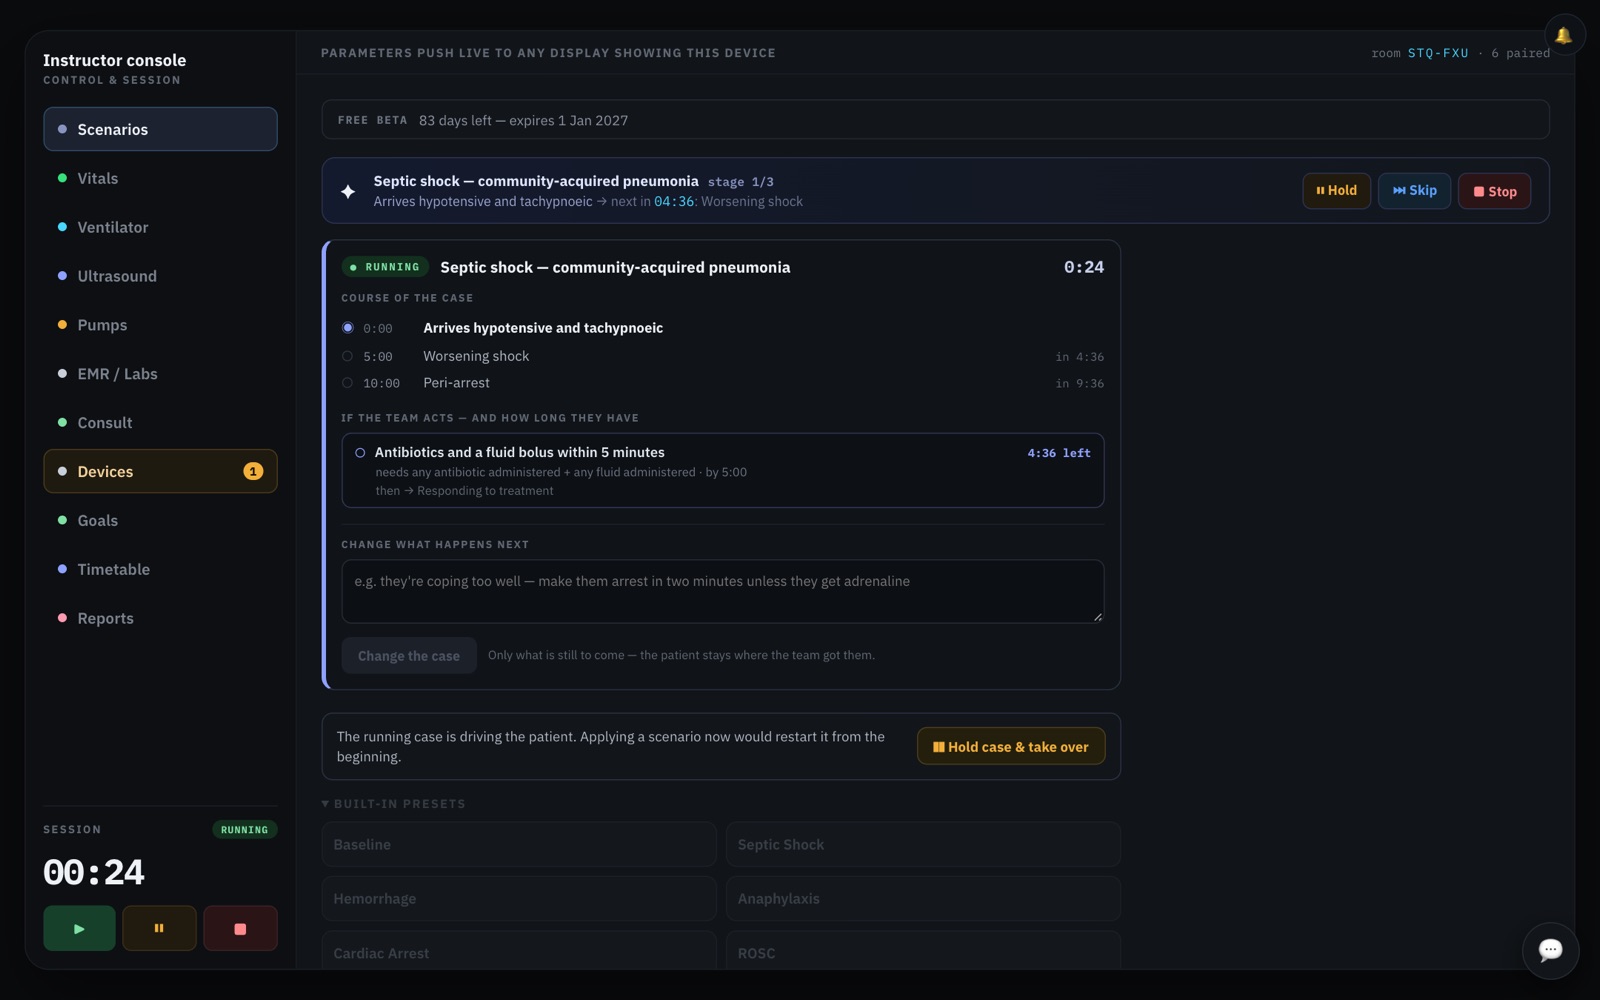
The banner buttons: ⏸ Hold freezes the course, ⏭ Skip jumps to the next stage, and ■ Stop ends the timed course but leaves the patient as they are. Banner Stop doesn’t end the session. To take over the patient by hand, use ❚❚ Hold case & take over.
Pausing
Change the patient: Vitals
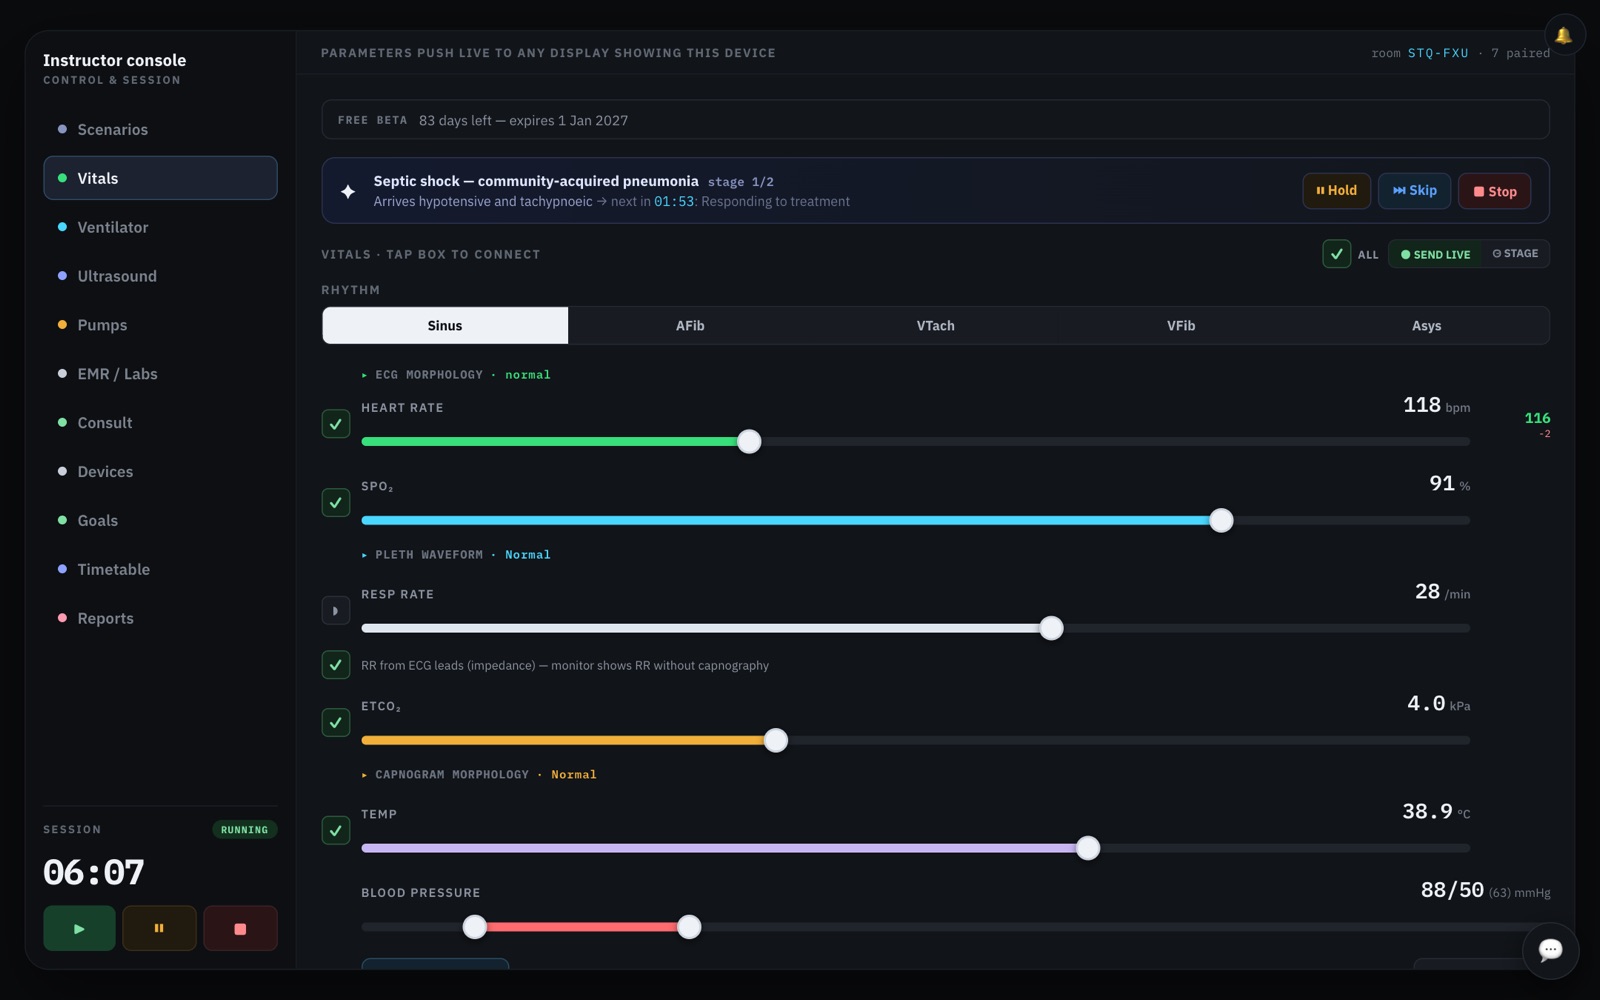
- Rhythm: Sinus, AFib, VTach, VFib or Asys.
- Sliders set the illness. Treatment acts on top of it, and the small coloured number beside each slider shows what the monitor is actually reading.
- Blood pressure: ↻ Cycle NIBP now takes a cuff reading (about 15 seconds). Arterial line adds an arterial line, which the learners have to zero on the monitor.
- Resuscitation: start and stop compressions, set CPR quality, mark the patient pulseless (PEA), give a breath, or ⚡ ROSC.
- ● SEND LIVE sends changes immediately. ⏲ STAGE queues them so you can release several at once.
Shocks and pacing
Learners charge and shock, or pace, on the monitor. On Vitals, under LEARNER THERAPIES, you decide what the patient does:
- Shock outcome: ROSC, Refractory or Asystole after a shock for VF or VT. Shocking any other rhythm is logged but changes nothing, so for synchronised cardioversion (of AF, say), change the rhythm yourself after the shock.
- Pacing: the current (mA) needed for electrical and mechanical capture, and whether learners are allowed to start pacing.
12-lead ECG
Open ECG MORPHOLOGY on Vitals to shape the ECG: blocks, bundle branch blocks, ST changes by territory, intervals, axis, named patterns such as Brugada or WPW, or describe it in words (AI). Preview 12-lead shows it to you. ⇪ EMR + monitor gives it to the learners; use this rather than ⇪ File to EMR so the team sees the tracing on the monitor.
Labs and imaging
- A learner orders a test on the EMR. The EMR / Labs tab flashes and the test shows a blue dot, with REQ beside each value they asked for.
- Set the values with the sliders. AI-built cases come with results already set. H and L flags follow the values.
- Press Send to EMR. The result appears on the learners’ EMR.
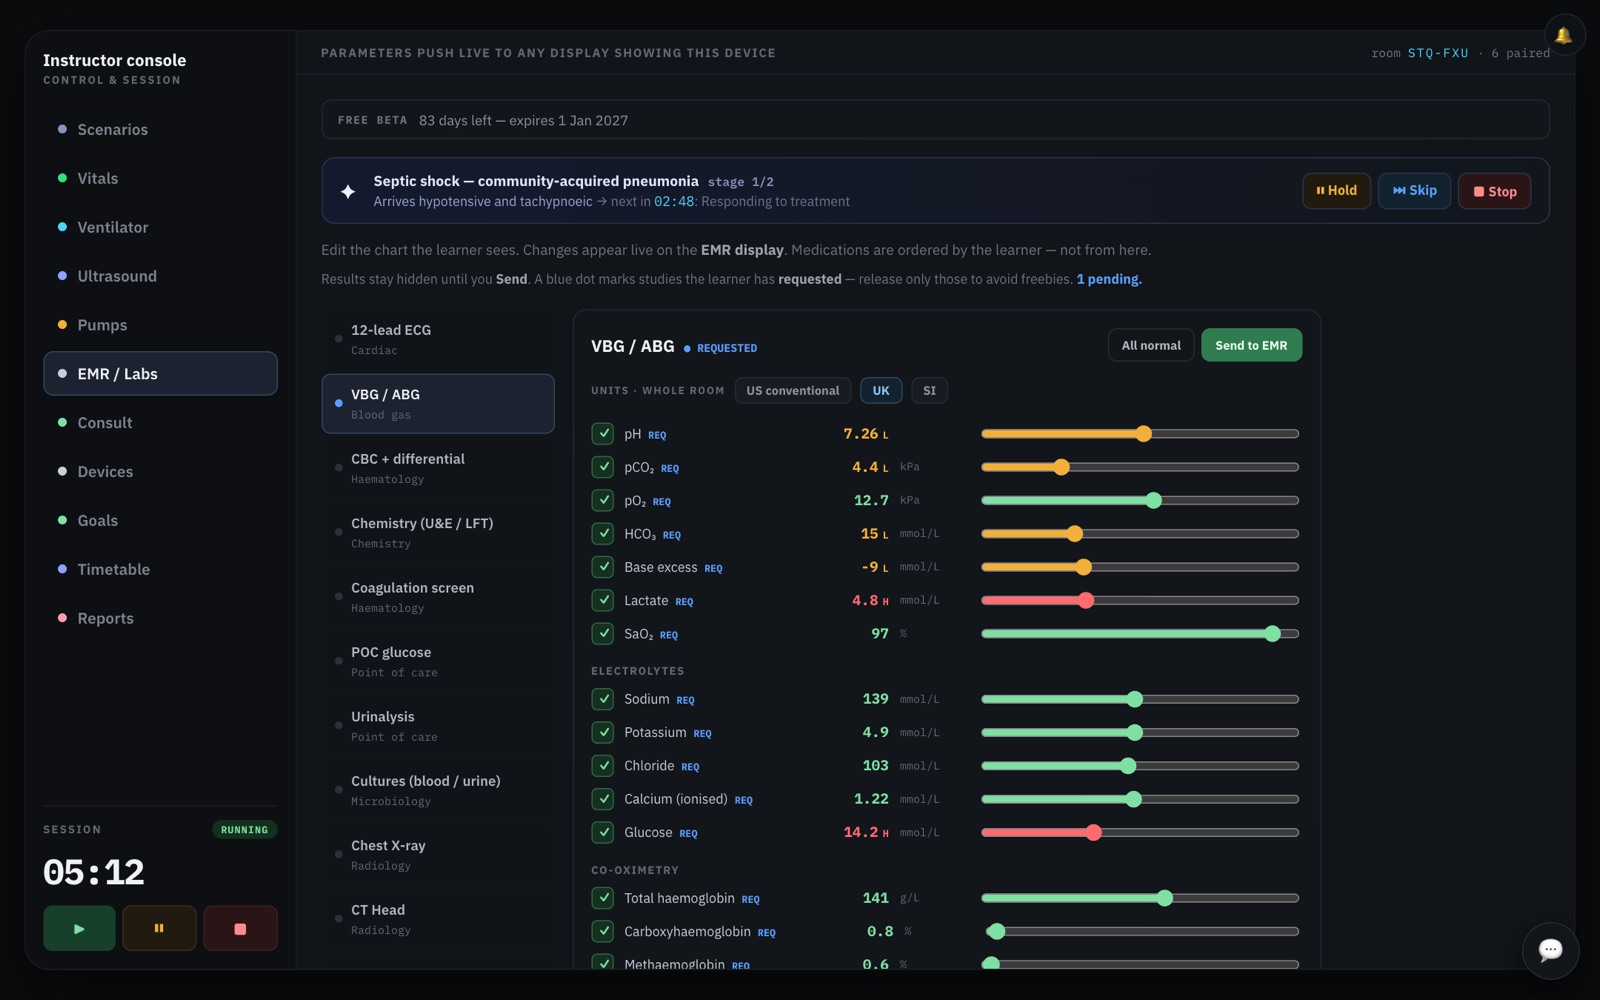
Results are a snapshot. If the patient changes later, press Re-send to give the team a fresh sample. For imaging, write the report and optionally add a real image with ↥ Choose an image.
Ventilator
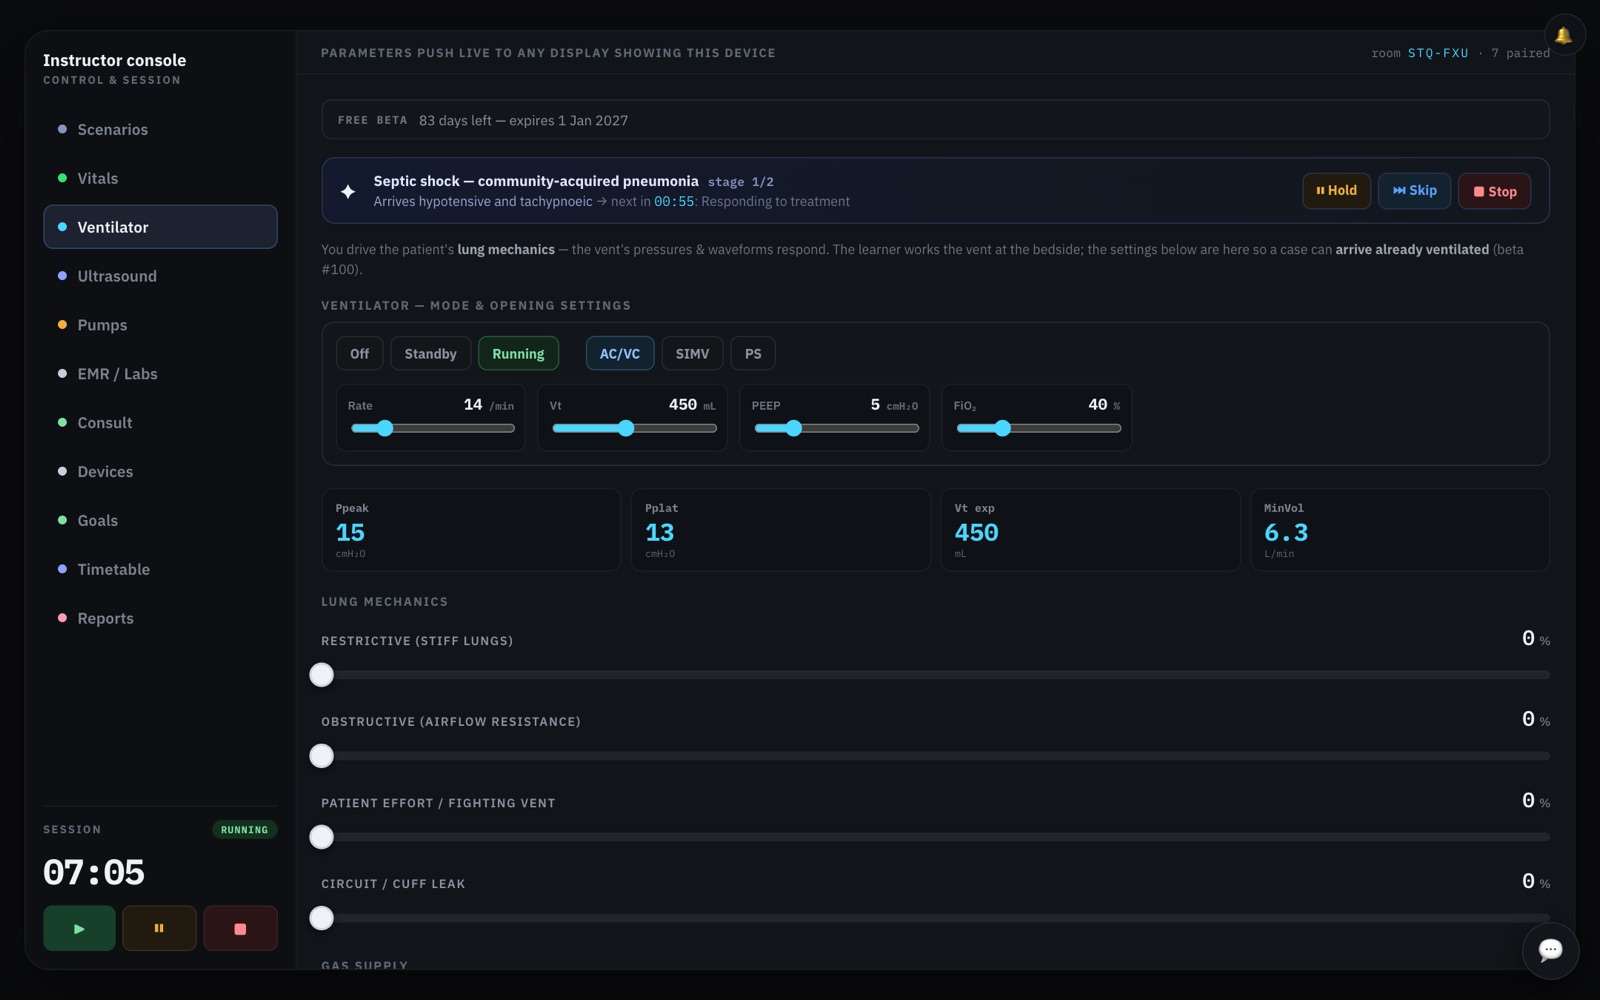
The Ventilator tab sets the mode and starting settings, the lungs (with presets such as ARDS, COPD/asthma, breath stacking, a circuit leak or a patient fighting the ventilator), and can fail the oxygen supply. Learners change settings on the ventilator itself and the patient responds.
Ultrasound
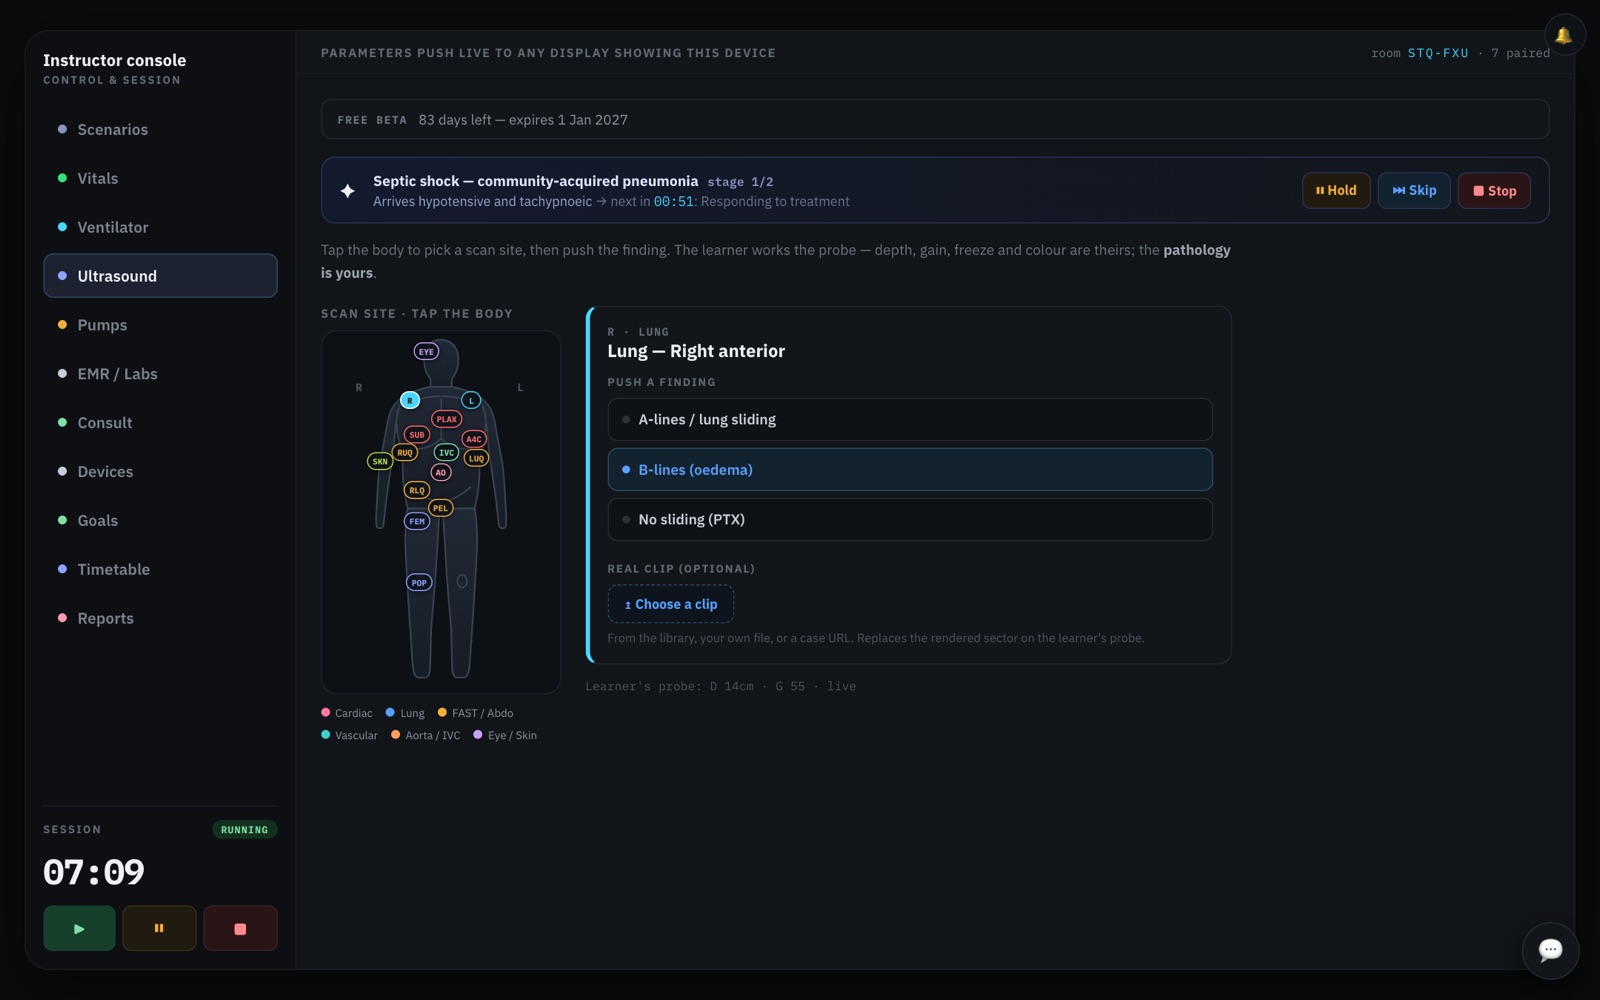
On Ultrasound, tap the body where the probe is, then choose what it shows, such as B-lines, a pericardial effusion or free fluid. You can also add a real clip. The learner controls depth, gain and freeze.
Pumps
The Pumps tab shows every infusion running. You can’t start infusions from here (learners do that on the EMR), but you can cause an ⚠ Occlusion, ⚠ Air in line or ⚠ Infusion complete alarm, which stops the drug until the learners deal with it.
Phone calls: you’re the specialist
When the learners call someone from the Phone, the Consult tab rings. Press Answer, then reply as the specialist: out loud from where you are, by text message, or with one of the prepared replies (these appear as text on the phone). You can also call the room yourself with 📞 Ring the room.
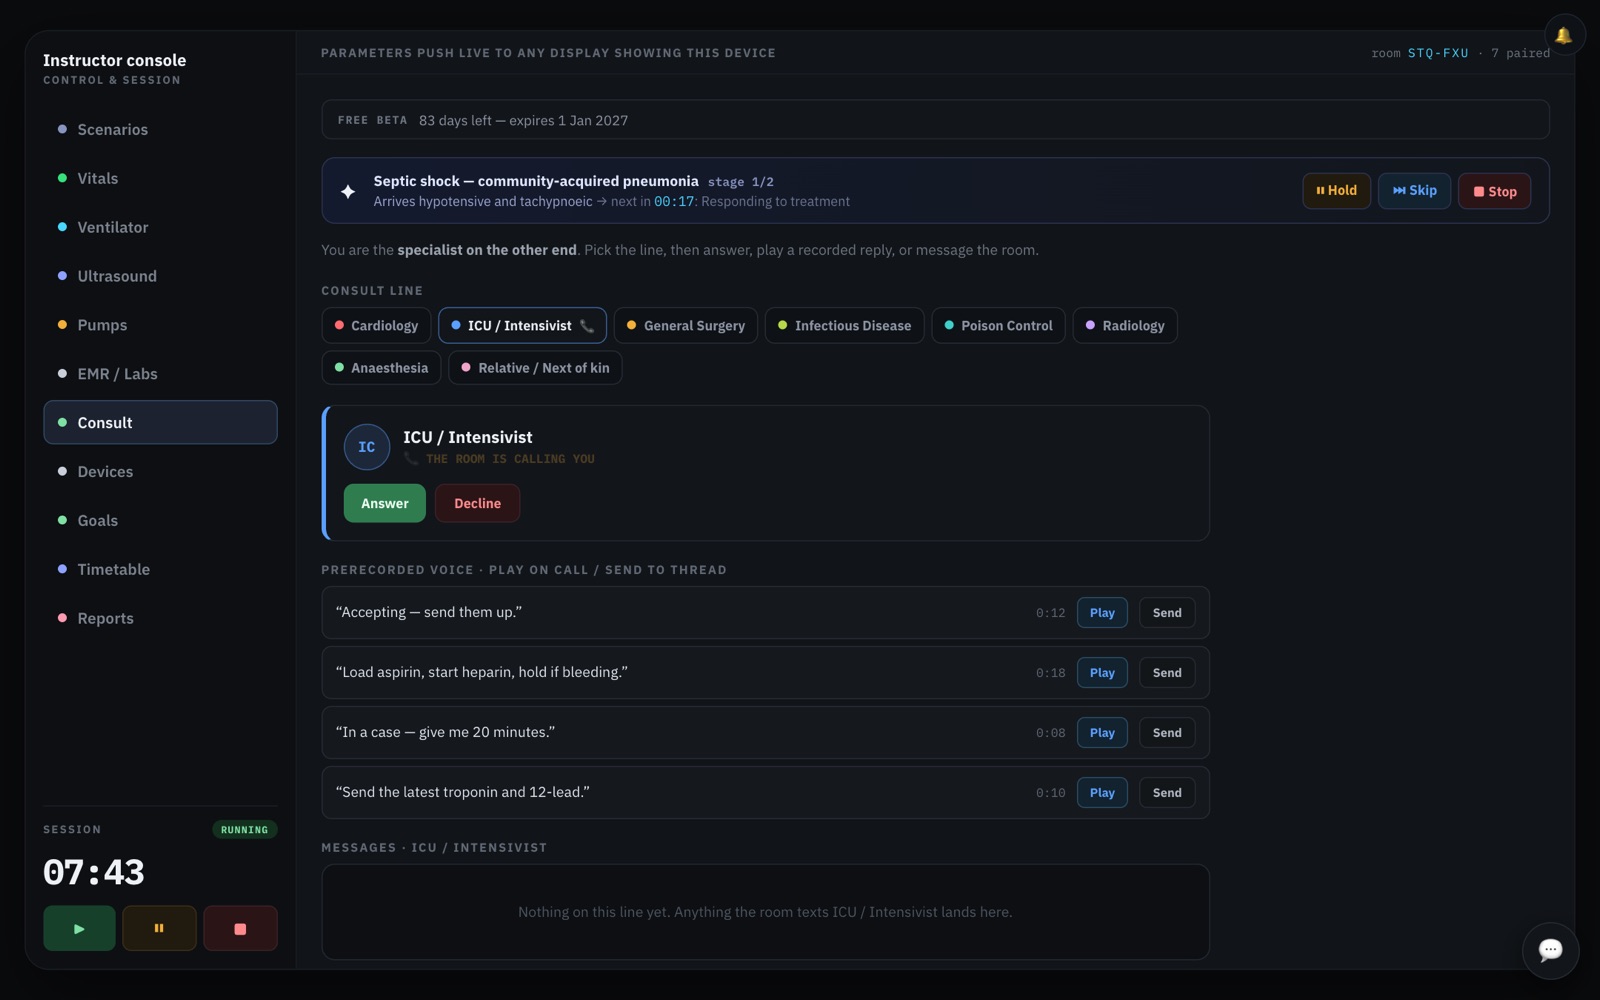
Talking through the tablet (🎧 Join live audio) needs Secure mode. Without it, answer the call and speak to the team directly, or use the messages. If the phone can’t open its microphone, it says why and links to the certificate and the step-by-step manual.
See what the team is doing
The Timetable logs every action, by you and by the learners, with the time, and you can search it. The Goals tab ticks goals off as they’re met, shows deadlines counting down, and flags anything harmful. Click a goal to tick or untick it yourself; your mark always wins.
The learners’ devices
What the team sees and does on each tablet. Everything they do changes the patient and is logged for the debrief.
On every device
- The SOURCE bar at the top lets learners change what a tablet shows, unless you’ve locked it (INSTRUCTOR SET). Changing it puts the tablet back to standby.
- ◫ SPLIT shows a second device alongside.
- Sound: tap the monitor once after admitting the patient to switch on its beeps and alarms. iPads won’t play sound until someone has touched the screen.
- Use the browser’s full-screen option, or add the page to the home screen, so it fills the tablet.
Monitor and defibrillator
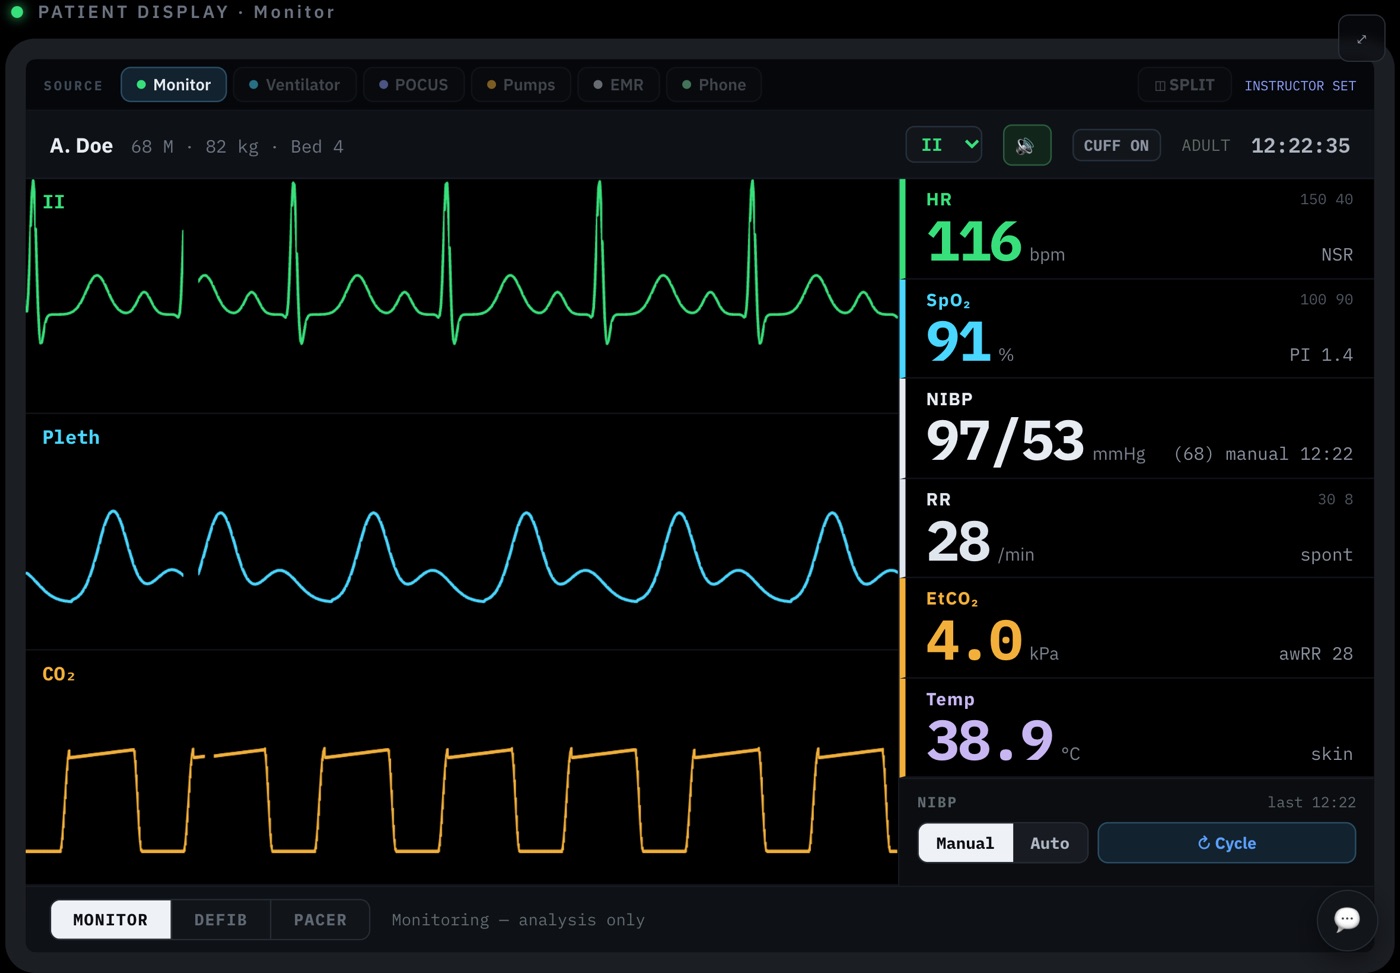
- Blood pressure: ↻ Cycle takes a reading (about 15 seconds). Auto repeats it every 1–15 minutes.
- Lead: choose the lead shown in the top lane.
- Arterial line: when you insert one, the learners have to press ZERO before it reads.
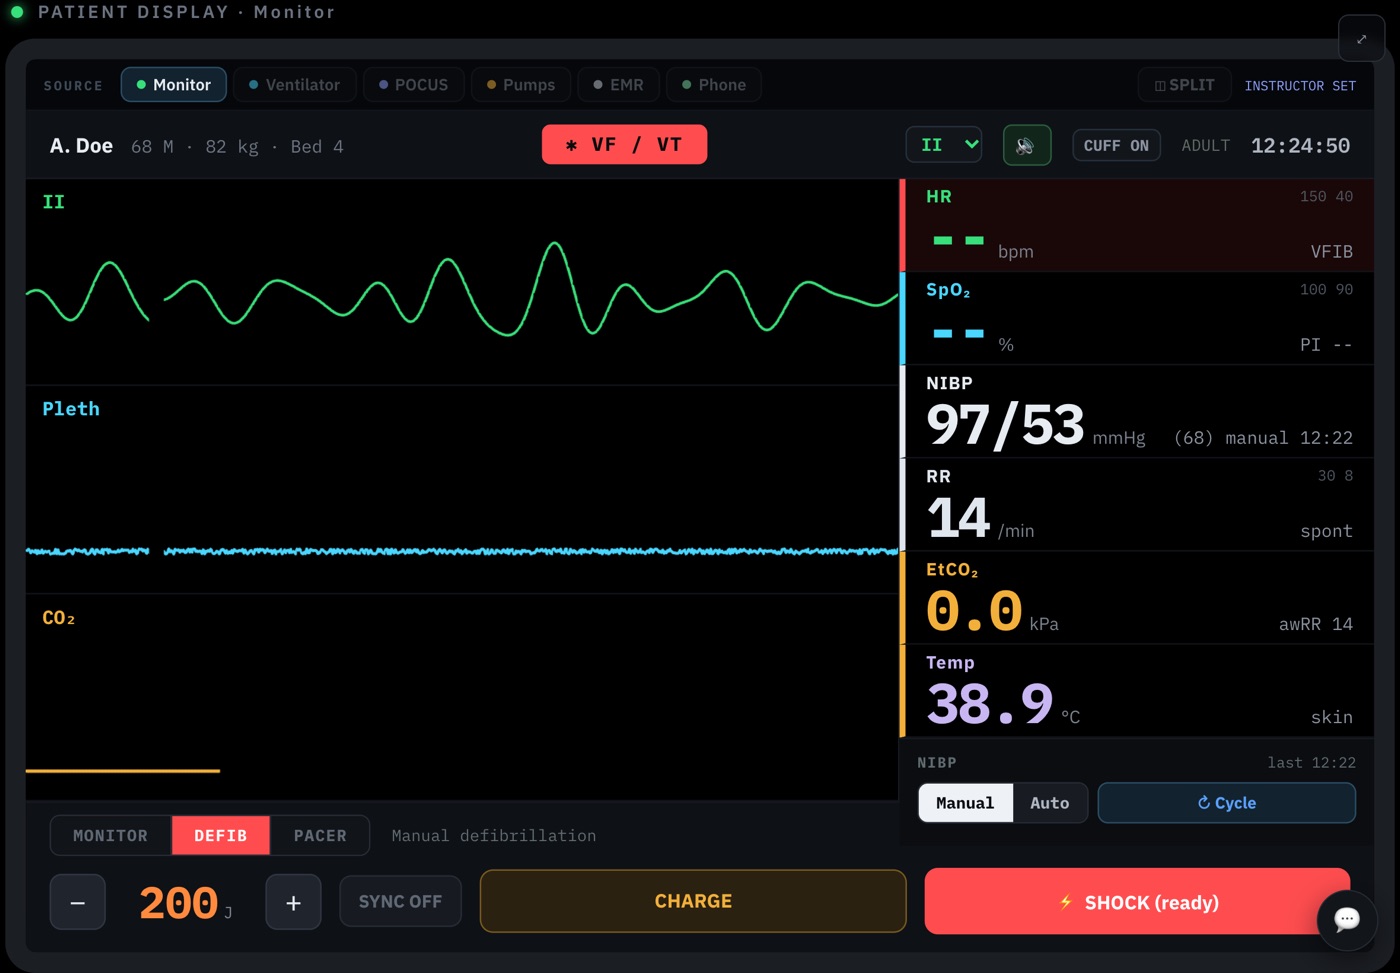
- Alarms flash for VF/VT, asystole, low saturation and low blood pressure.
Defibrillation: press DEFIB, set the energy with − and +, press CHARGE, then ⚡ SHOCK. SYNC arms synchronised cardioversion. Every screen flashes when a shock is given. Pacing: press PACER, set the rate and current, and press START PACING.
EMR
The team signs in with any name. The tabs:
- Chart and EMS: background and the ambulance handover.
- SOAP: the team’s notes, shown in the debrief.
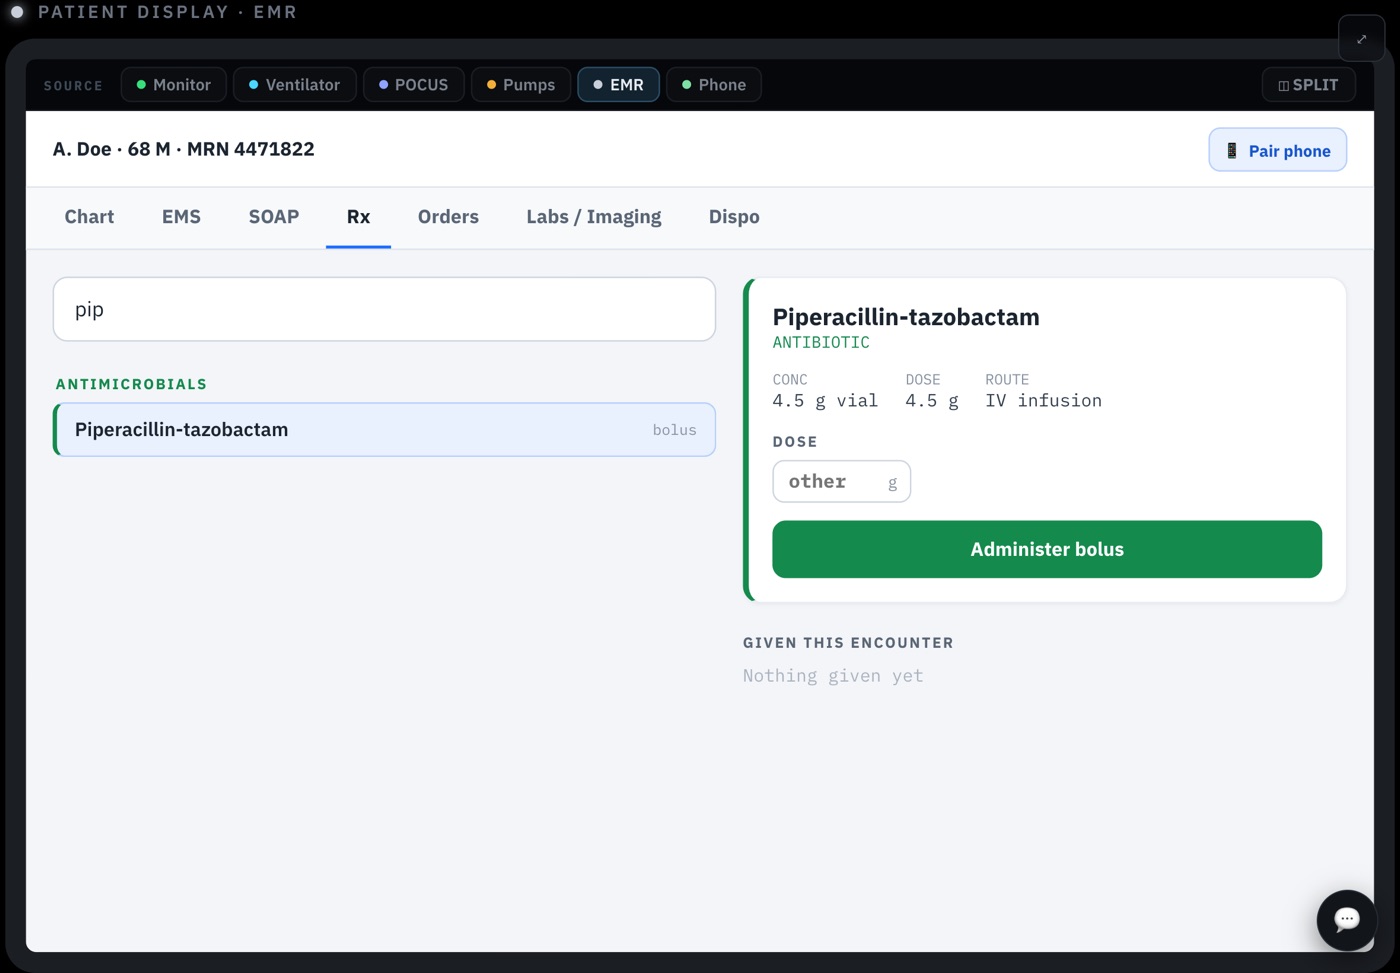
- Rx: prescribe and give medicines. Search for a drug, choose a dose, then Administer for a bolus or Start infusion, which loads it onto the pumps. Doses matter: too little has little effect, and too much causes side effects.
- Orders: oxygen, position, IV/IO access, catheter and other nursing orders. Oxygen and position change the patient.
- Labs / Imaging: order tests. Results appear only when you send them.
- Dispo: where the patient goes, the working diagnosis, and ⏹ End case.
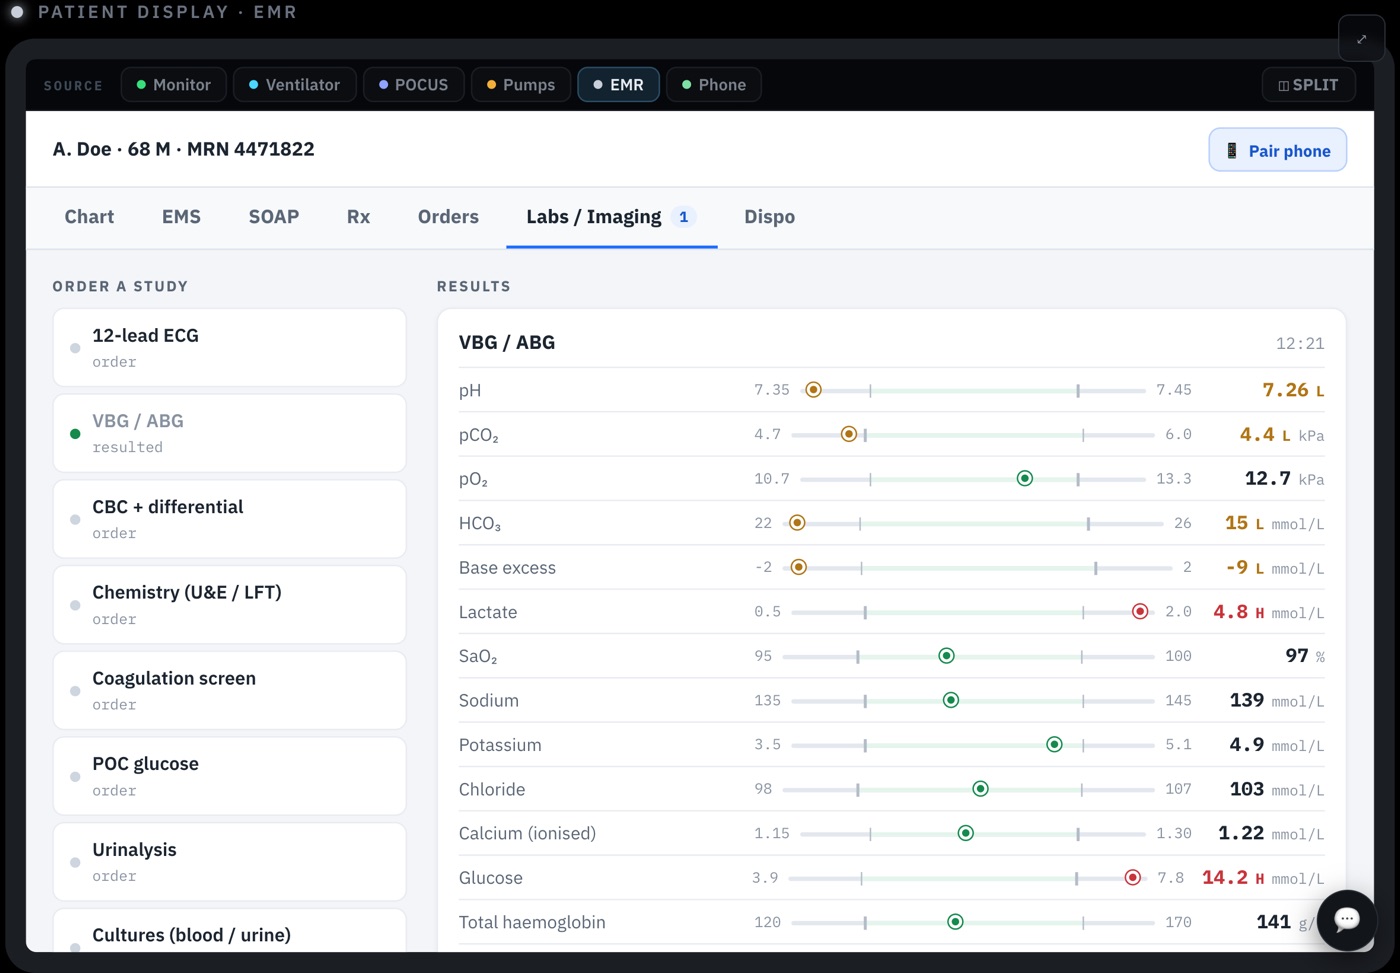
A test can be ordered once. For a repeat (say, a second blood gas), use Retract and then Send on your side.
📱 Pair phone at the top of the EMR shows a QR code that learners can scan with their own phones (see Student phones).
Pumps
Infusions started on the EMR appear here. The team changes the rate with − and + or by typing it, then presses ✓ Confirm. They can also Pause and Stop. After an alarm, Silence & clear leaves the pump paused; press ▶ Resume to restart it.
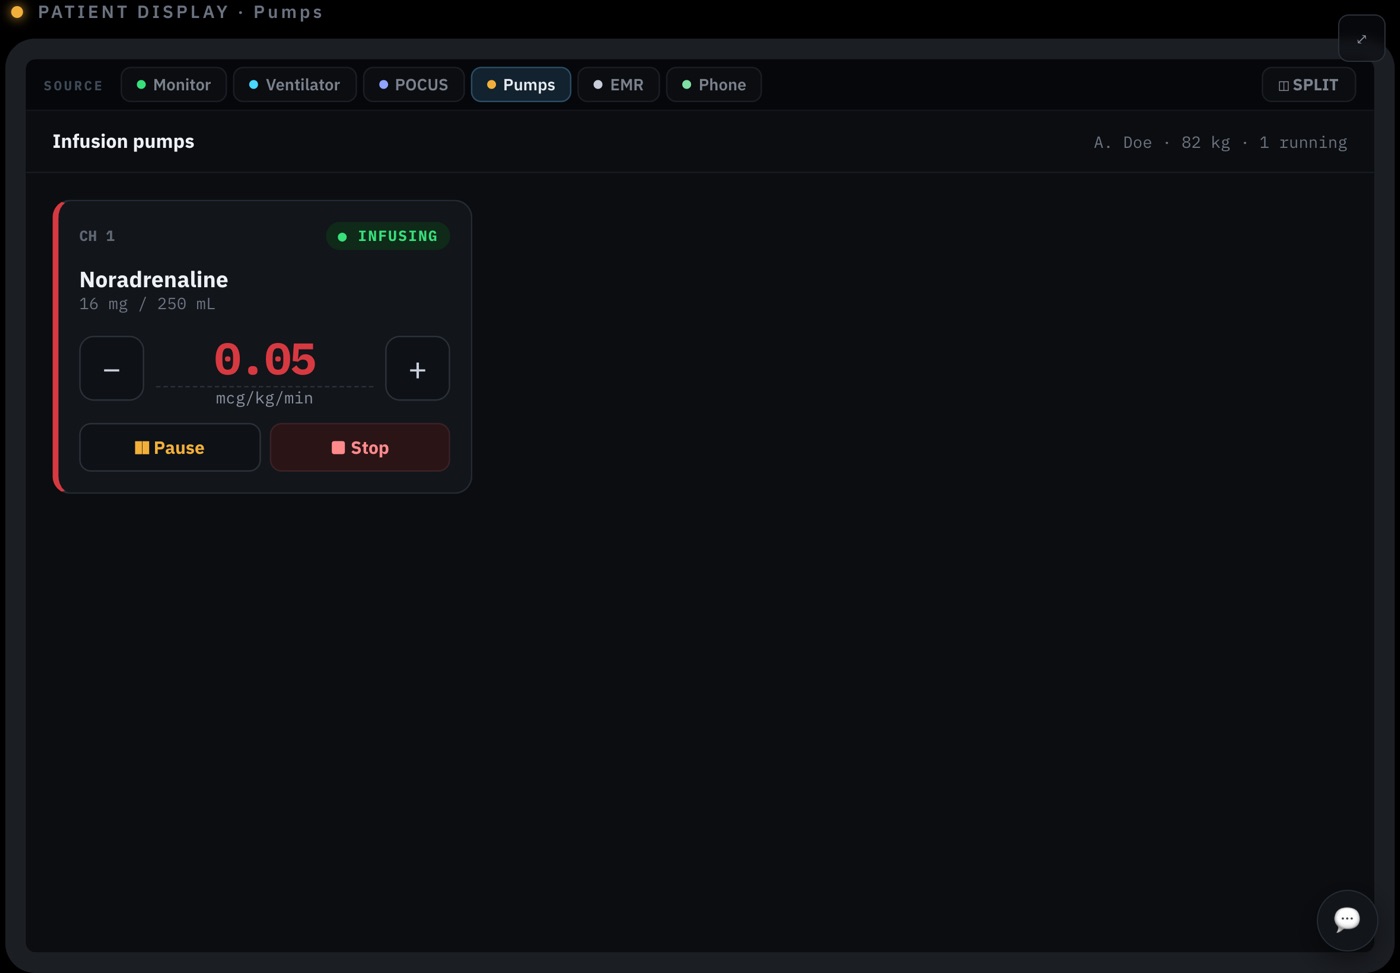
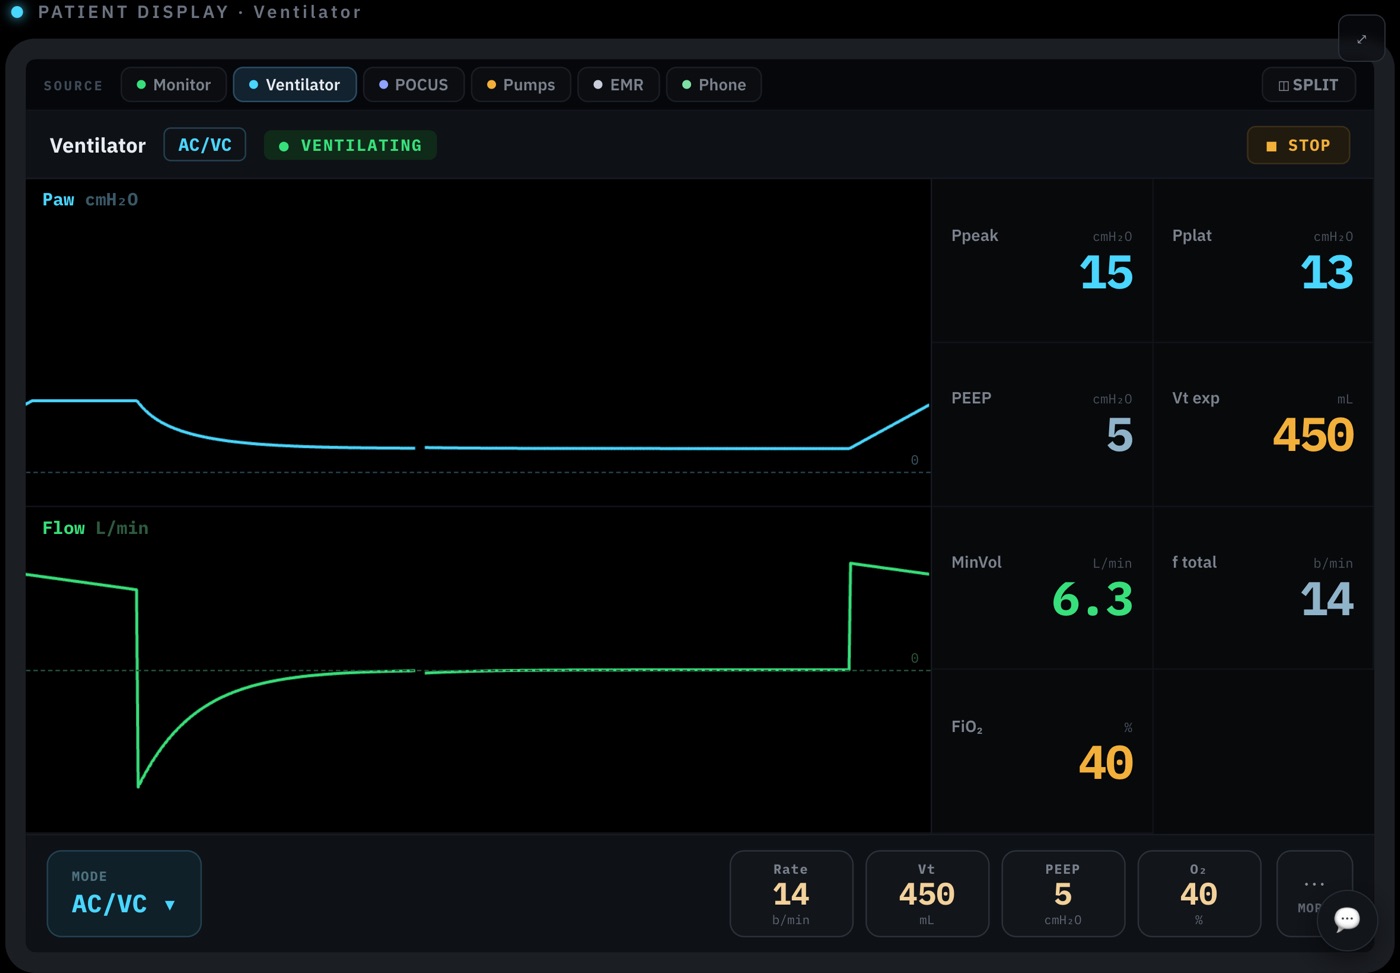
Ventilator
After Power on, the ventilator starts switched off. Press ⏻, then ▶ Start ventilation. Change a setting by tapping it (Rate, Vt, PEEP, O₂), adjusting it, and pressing ✓ Confirm. ⋯ MORE has alarm limits, I:E and an expiratory hold.
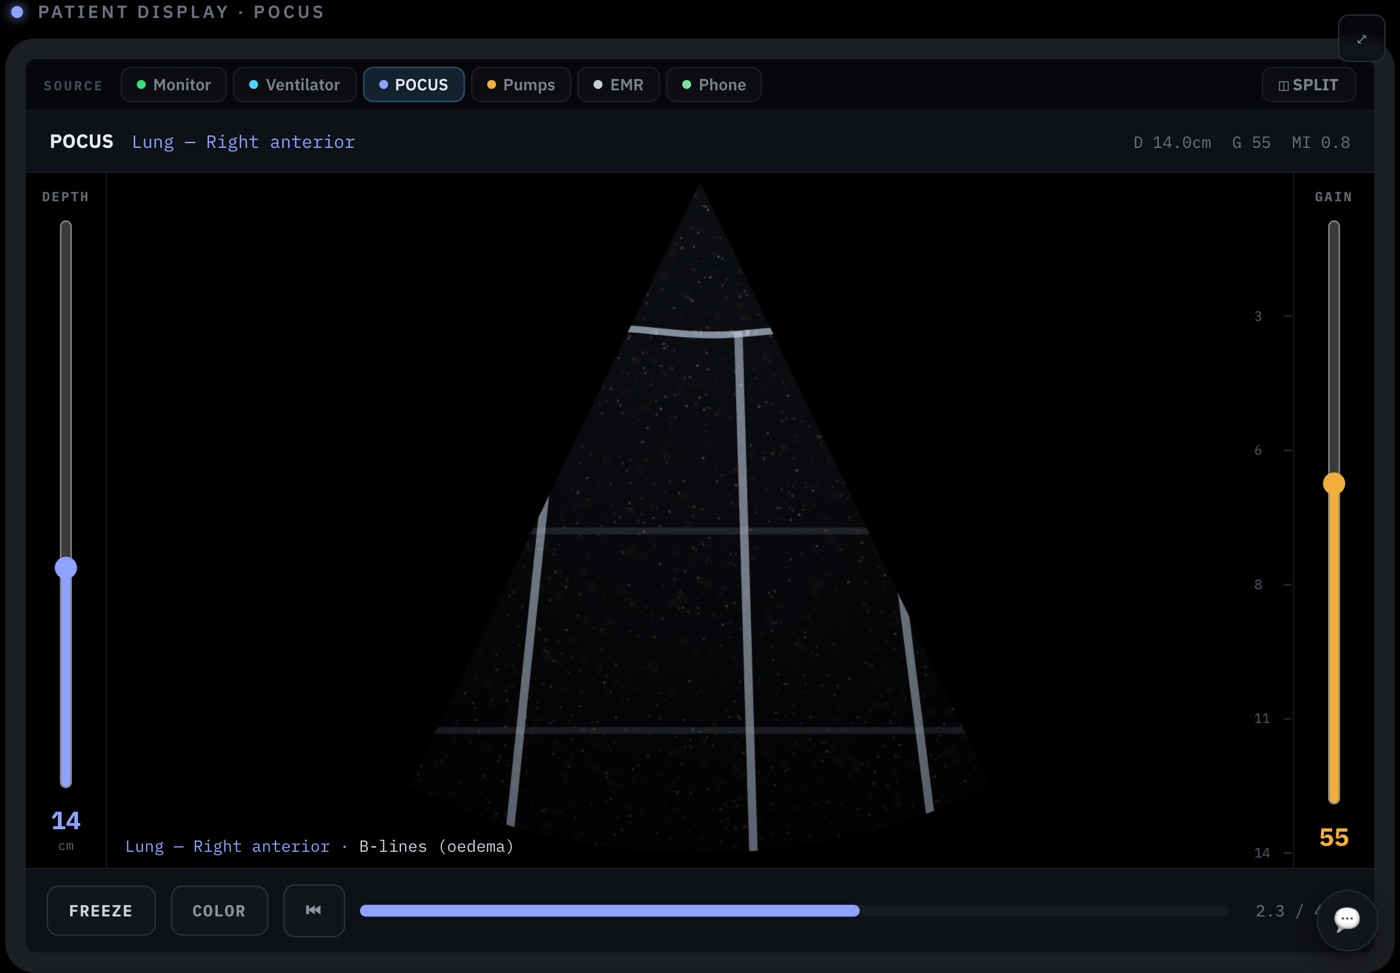
Ultrasound (POCUS)
Shows the view you’ve chosen on the console. Learners adjust depth and gain, and can FREEZE and scroll back through the clip.
Phone
A contacts list: cardiology, ICU, surgery, infectious diseases, poisons, radiology, anaesthesia and next of kin. Learners call (📞) or message (💬), and you answer on the Consult tab.
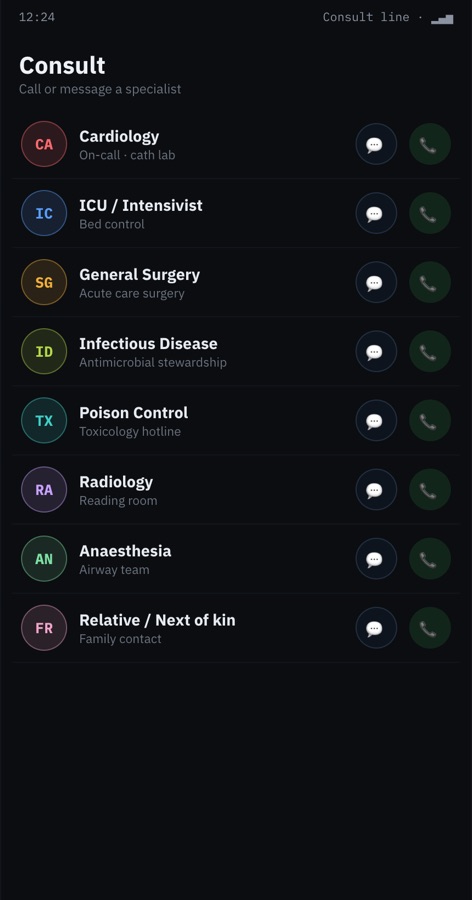
A tablet set to Phone fills the screen with the phone. To change it back, use the Devices tab.
Student phones
Learners can join with their own phones by scanning 📱 Pair phone on the EMR. Their phone offers four Sim apps: Consult phone (works straight away), and CPR sensor, BVM sensor and Recorder, which need Secure mode.
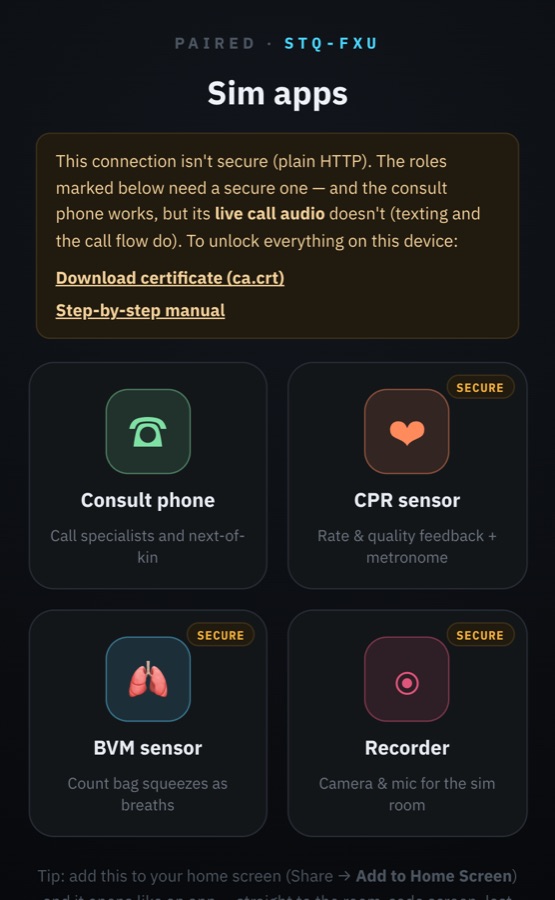
Student phones don’t appear on your Devices tab, and a phone used as the CPR sensor overrides the compressions switch on your Vitals tab. Close the CPR sensor when it isn’t in use.
Debrief
Ending the case
- You: press ■ in the session controls. The debrief opens immediately.
- The team: on the EMR’s Dispo tab, choose where the patient is going, press ⏹ End case, then ⏹ Confirm — end the case for everyone.
All the learner devices go back to standby. The debrief appears on your console only. To show it to the room, share your screen or put the console on a projector.
What the debrief shows
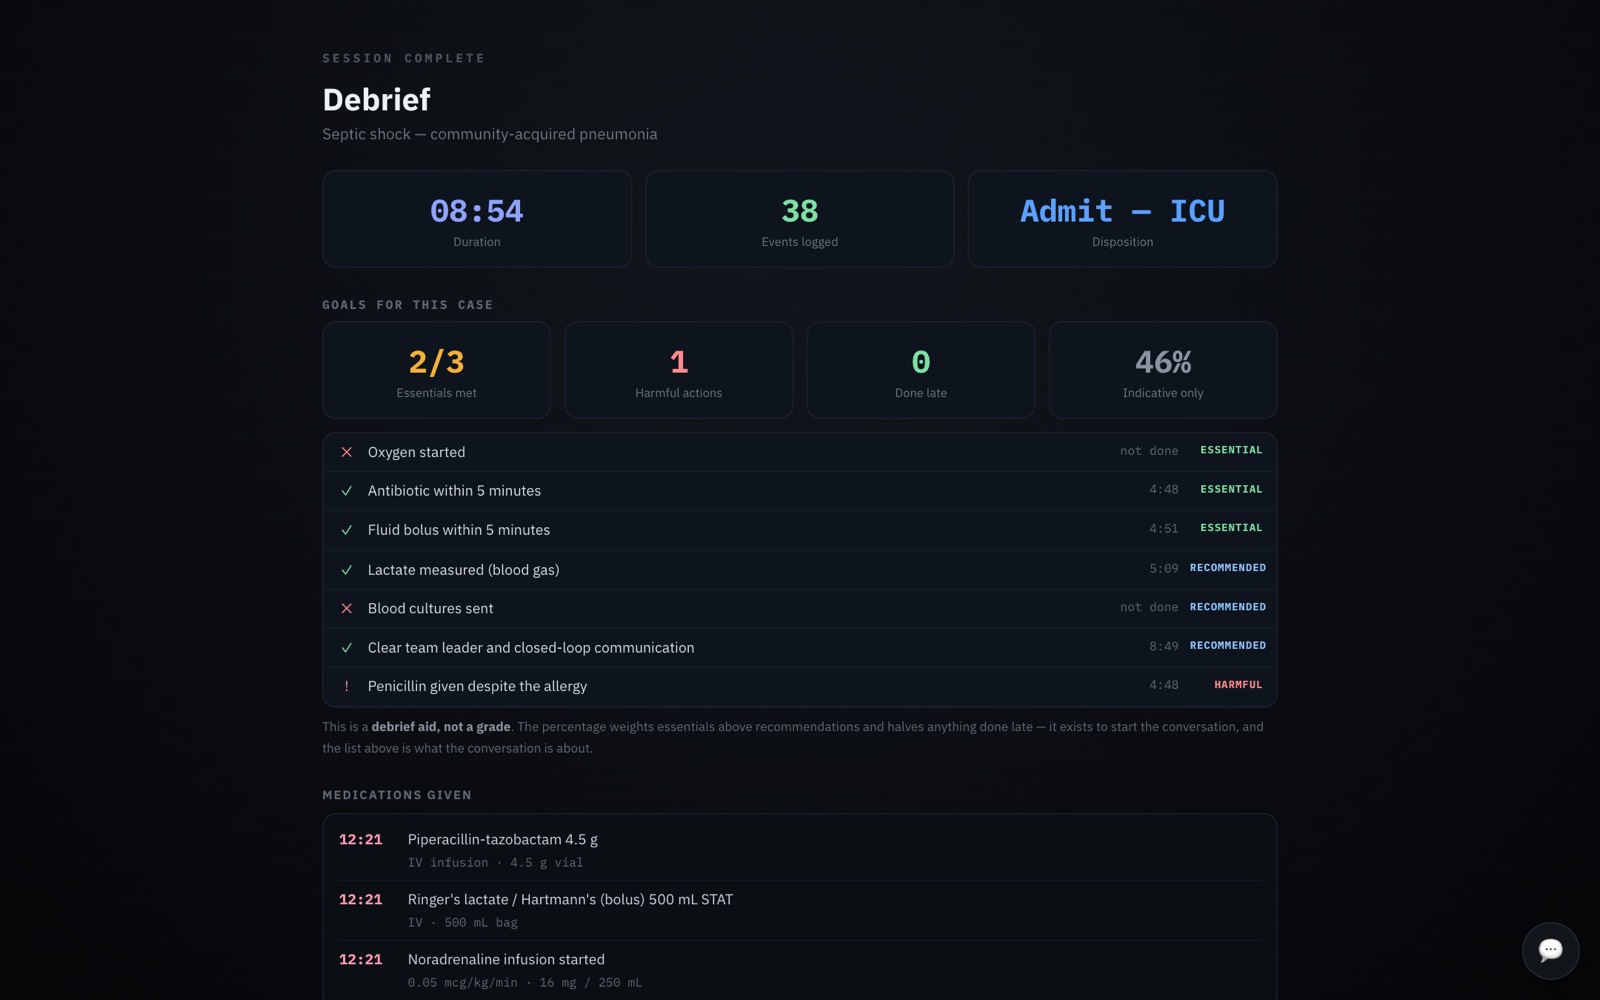
- Duration, events logged and disposition.
- Goals for this case: essentials met, harmful actions, anything done late, and a percentage. It’s a starting point for the conversation, not a grade.
- Medications given, with times and doses.
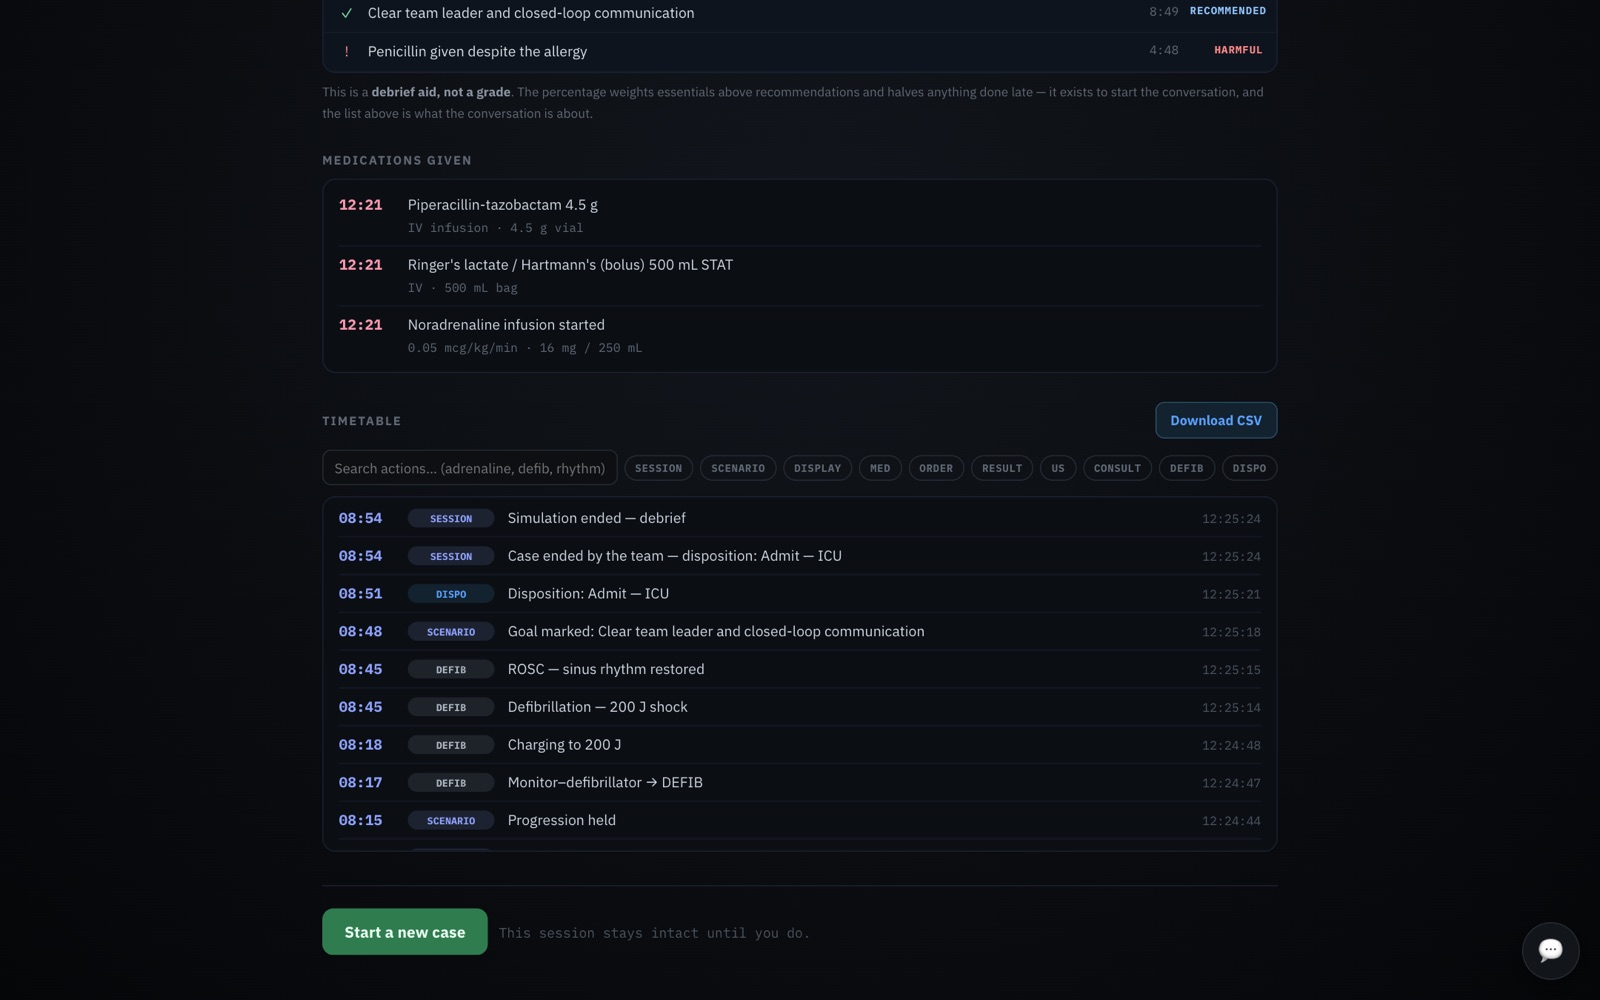
- Timetable: everything that happened, searchable and filterable. Download CSV saves it as a spreadsheet.
- Learner’s note: what the team wrote in SOAP.
Next case
Start a new case clears the patient and the log and takes you back to “Connect the room”. The tablets stay paired, so you can go straight back into the control room. It also resets the units to US; set them again on EMR / Labs. The debrief stays until you press it, so you can take your time.
Secure mode: sensors, live audio and recording
Optional. Everything in this guide so far works without it. Turn it on only if you want one of these:
- Live call audio: talking to the learners through the phone.
- CPR sensor: a phone strapped to the manikin’s chest measures compression rate and depth.
- BVM sensor: a phone on the bag counts breaths.
- Recorder: a phone or tablet films the room for the debrief.
Browsers only allow the camera, microphone and motion sensors on a secure (https) connection. Secure mode gives the host a certificate, which each device has to trust once.
- On the host, open the setup check (Open setup check from the menu-bar or tray icon, or ⚙ Network setup & device check on the Devices tab). Expand Advanced · turn on secure features without accounts (for pilots) and press Enable secure mode on this machine.
- iPhone / iPad: scan the certificate QR code in Safari, install the profile (Settings ▸ General ▸ VPN & Device Management), then turn on full trust for ResusSim Local CA in Settings ▸ General ▸ About ▸ Certificate Trust Settings.
- Android, Chromebook or laptop: download the certificate (ca.crt) from the same panel and install it as a trusted certificate.
- After that, devices switch to the secure connection on their own.
The step-by-step guide with pictures for each kind of device is at sim.resussummit.com/secure-mode.
Troubleshooting
| What you see | What to do |
|---|---|
| A tablet scans the code but never connects | Check it’s on the same Wi-Fi as the host and that its VPN is off. If it still fails, the network is blocking devices from talking to each other. Switch to a phone hotspot or your own router (Choose the network). Run the setup check to confirm. |
| Nothing connects to a Windows host | Allow ResusSim in Windows Defender Firewall for Private networks, and set the Wi-Fi to Private in Windows’ network settings. On a managed PC, ask IT. |
| Nothing connects to a Mac host | System Settings ▸ Network ▸ Firewall ▸ Options: make sure ResusSim is allowed to accept incoming connections. |
| The app opened on “Get the room connected” and there’s no way on | That’s the first-launch check. Close the window, then click ResusSim in the Dock (Mac) or open ResusSim again from the Start menu (Windows). |
| The monitor says LEADS OFF and shows dashes | Connect the sensors: tick ALL on the Vitals tab. |
| Device buttons say “Standby” and can’t be pressed | The simulation hasn’t started. Press ▶. |
| A tablet says “Waiting for the instructor to start the simulation” even though it’s running | It has lost its connection to the host. Check its Wi-Fi, then reload the page. |
| The consult phone has no live audio, or says it could not open the microphone | The phone doesn’t trust the host’s certificate yet. If Safari’s address bar says “Not Secure”, finish every step in Secure mode, especially the trust switch in Certificate Trust Settings. If you installed a ResusSim certificate before, from another computer or while ResusSim was on different ports, remove that profile first (Settings ▸ General ▸ VPN & Device Management), then install it again from the certificate QR code on the setup check. |
| The setup check shows a port other than 4000 | Another program on the host was using the usual port, so ResusSim took the next one. Use the address the setup check shows, and scan its new QR codes on devices you set up before. To get the usual port back, quit the other program, then quit ResusSim from the menu-bar or tray icon and open it again. |
| No sound from the monitor | Tap the monitor screen once. Check the speaker icon isn’t muted and the tablet’s volume is up. |
| A tablet arrives after the case has started | Type the address shown on the setup check with /display on the end, then the room code from the top right of the console. |
| All the tablets show “Pair to a room” and the room code has changed | If the console is closed and nothing is connected for 15 minutes, the room closes. Pair the tablets again with the new code. |
| A stage fired as soon as I resumed | ⏸ alone doesn’t hold a timed case. Use ⏸ Hold on the banner too (Pausing). |
| I pressed ■ by mistake | The case can’t be resumed. Go through the debrief, then Start a new case. |
| “AI allowance used for today” | You’ve made 10 AI requests in the last 24 hours. The message says when you can generate again. Saved and built-in cases still work. |
| The AI case says OFFLINE FALLBACK | The host isn’t online, or isn’t signed in. Connect to the internet and generate again. |
| The sim stopped when I closed the laptop | A closed lid puts the computer to sleep. Keep it open and plugged in. |
Getting help
The 💬 feedback bubble is on every screen, on the console and on every tablet. Choose Bug, Feedback or Change request, describe what happened, and press Send. It goes straight to the ResusSim team, with the screen it was sent from attached. If you’re offline, it sends when you’re next online.
Email resussim@resussummit.com for anything else, including installation problems. Say whether your host is a Mac or a Windows PC, and include a screenshot if you can.
This is a beta, so your feedback shapes what we build next. Thank you for testing it.